Search - voxel zip
Voxel Playground, the companion app to Voxel Paint that you can use to stage and test your .vpp creations, has been moved to a new domain (https://playground.voxelpaint.online/) and revamped with a new interface overhaul and new features, with several more features to come in the not-too-distant future! Let's take a look at what is new with Voxel Playground.
The most obvious change is the URL move off of Ape Web Apps and on to the new voxelpaint.online domain, which will soon be hosting the core Voxel Paint app as well. I think that long term this change will be better for both products, and it more accurately highlights how they are a part of the same overall package.
Voxel Playground is now completely installable as a PWA, and doing so will allow the app to become a file handler for the new Voxel Playground Project (*.vpg) file type. Since there is now a file type and file association, that obviously points to the next feature of the app, which is that you can now save and load your projects.
Importing content is now super easy in Voxel Playground. You can either click on the (+) icon on the left sidebar, or you can simply drag/drop your voxel files right into the Voxel Playground window. Voxel Playground supports .vpp, .vox and image files.
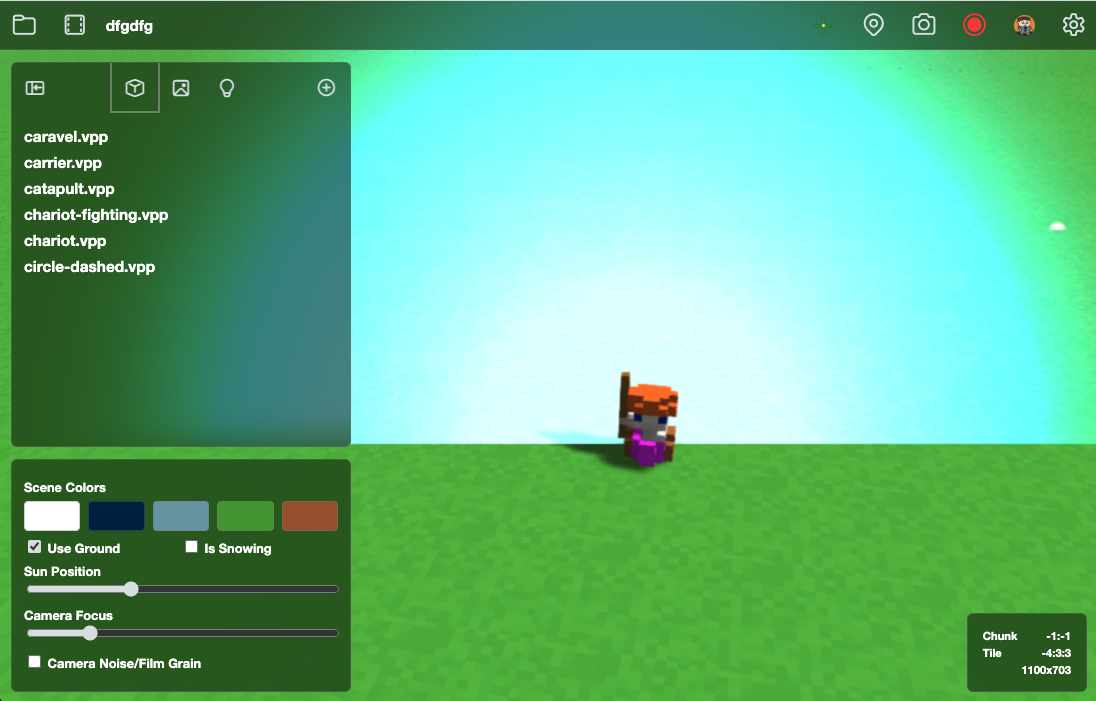
The next new feature to Voxel Playground is scenes. The Scenes button is to the right of the File menu icon on the top toolbar. A project can now contain multiple scenes that all share from the same asset pool. You can rename, delete and even clone scenes. This makes it easier to create a larger project full of scenes that share the same general theme.
The last new feature is the new Video Recorder! In addition to the regular camera tool that was already included with Voxel Playground, you can now record a video of your scene and export it to your filesystem. This is a cool feature to play with right now, but it will be even cooler in the future.
Coming Soon
I mentioned that there is more to come in the future for Voxel Playground. As you may know, My Colony 2 will be coming to Steam later this year, and one of the requirements for Steam distribution is to have one or more promo videos for your game. I have a cool idea for a My Colony 2 trailer that begins with a small cinematic scene before showing off some gameplay footage, and Voxel Playground is the tool that I am building up in order to be able to make that video.
To that end, the next updates are going to add some key features that will be necessary to make cool voxel based short films. First, you need to be able to edit the terrain, both color/texture and elevation, so Voxel Playground will be getting a proper terrain editor. Next, there needs to be some basic scripting tools for animating your voxel objects. You also need to be able to edit/manipulate objects after they have been placed in a scene. Also, Voxel Playground should play all of the effects that you can add to Voxel Models in Voxel Paint (such as the smoke effect, etc).
So that is what is new and what is coming soon to Voxel Playground. It has been bumped up a bit on the priority list so that I can get that promo video made for MC2 in time for steam, but with the changes coming due to that, it should be a really need tool for creating neat little independent voxel based videos. So check it out, let me know what you thing, give suggestions if you have anything you want to see added, and stay tuned for more!
https://playground.voxelpaint.online/
#voxelplayground
The most obvious change is the URL move off of Ape Web Apps and on to the new voxelpaint.online domain, which will soon be hosting the core Voxel Paint app as well. I think that long term this change will be better for both products, and it more accurately highlights how they are a part of the same overall package.
Voxel Playground is now completely installable as a PWA, and doing so will allow the app to become a file handler for the new Voxel Playground Project (*.vpg) file type. Since there is now a file type and file association, that obviously points to the next feature of the app, which is that you can now save and load your projects.
Importing content is now super easy in Voxel Playground. You can either click on the (+) icon on the left sidebar, or you can simply drag/drop your voxel files right into the Voxel Playground window. Voxel Playground supports .vpp, .vox and image files.
The next new feature to Voxel Playground is scenes. The Scenes button is to the right of the File menu icon on the top toolbar. A project can now contain multiple scenes that all share from the same asset pool. You can rename, delete and even clone scenes. This makes it easier to create a larger project full of scenes that share the same general theme.
The last new feature is the new Video Recorder! In addition to the regular camera tool that was already included with Voxel Playground, you can now record a video of your scene and export it to your filesystem. This is a cool feature to play with right now, but it will be even cooler in the future.
Coming Soon
I mentioned that there is more to come in the future for Voxel Playground. As you may know, My Colony 2 will be coming to Steam later this year, and one of the requirements for Steam distribution is to have one or more promo videos for your game. I have a cool idea for a My Colony 2 trailer that begins with a small cinematic scene before showing off some gameplay footage, and Voxel Playground is the tool that I am building up in order to be able to make that video.
To that end, the next updates are going to add some key features that will be necessary to make cool voxel based short films. First, you need to be able to edit the terrain, both color/texture and elevation, so Voxel Playground will be getting a proper terrain editor. Next, there needs to be some basic scripting tools for animating your voxel objects. You also need to be able to edit/manipulate objects after they have been placed in a scene. Also, Voxel Playground should play all of the effects that you can add to Voxel Models in Voxel Paint (such as the smoke effect, etc).
So that is what is new and what is coming soon to Voxel Playground. It has been bumped up a bit on the priority list so that I can get that promo video made for MC2 in time for steam, but with the changes coming due to that, it should be a really need tool for creating neat little independent voxel based videos. So check it out, let me know what you thing, give suggestions if you have anything you want to see added, and stay tuned for more!
https://playground.voxelpaint.online/
#voxelplayground
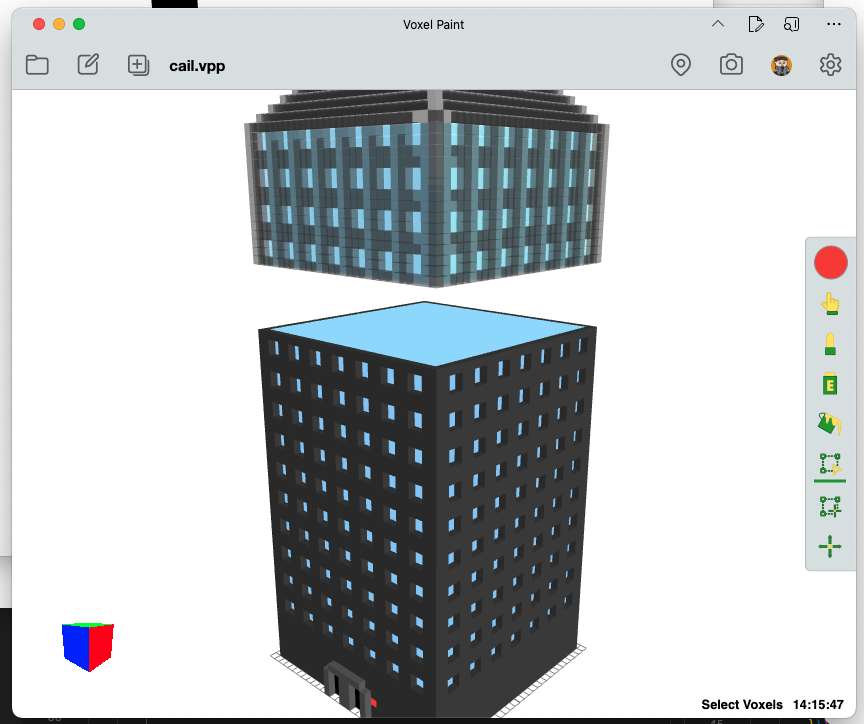
Today I am finalizing v1.7.0 of Voxel Paint which is a fairly considerable update with several new tools and features being added into the program. Let's take a look at what's new!
First off, Voxel Paint now has, not one, but four pen tools available, accessable by either right-clicking on the pen tool icon, or selecting the pen tool again when you are already using one of the pens (for mobile access). Doing so will give you this new context menu where you can select which pen tool you are interested in using:
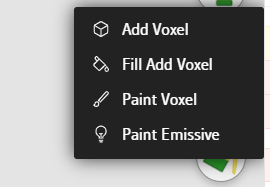
The Add Voxel tool is the same that it's always pen, the regular pen.
The new Fill Add Voxel tool accepts two clicks and will then fill in every cube in-between the first and second click. For instance, if you click on the top left corner of the painting and then the bottom left, you will get this:
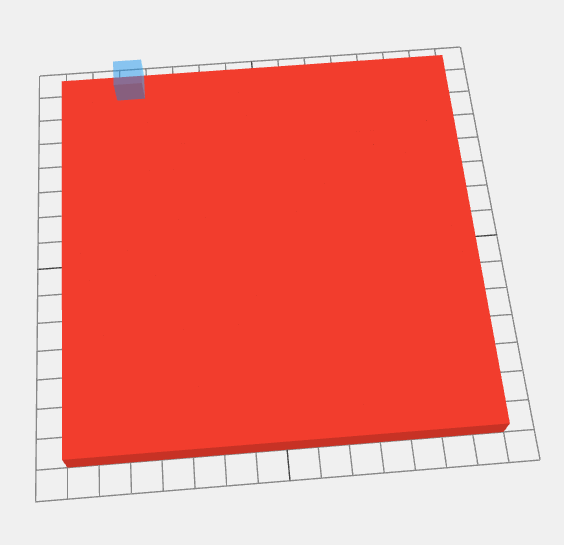
Certainly a lot faster than single clicking on each individual tile!
The Paint Voxel tool is used for painting over, or changing the color of already existing voxels, handy for adding texture to a model or simply making changings without having to erase and redraw parts of your model.
Finally, the new Paint Emissive tool is used for quickly setting a group of voxels as emissive. You use it by "drawing" over them as with the Paint Voxel tool. It also allows mobile users to set voxels as emissive, as they couldn't before.
In order to keep all of the new tools straight, there is a new readout area on the bottom-right of the screen next to the coordinate readout that lets you know which tool you are currently using.
Aside from the new pens, there are a couple of more tools you will find in this release. Under the Image menu, there is a new Hollow Image wizard. This tool will go through your model and automatically remove all cubes that are not visible from the outside. This is a handy feature if you've just created a bunch of new voxels using the Fill Add Voxel tool and want to remove the excess in the center. Hollowing an image can greatly reduce your .vpp file size, as well as rendering performance.
When you first load up Voxel Paint, the default file size has been changed from 20x20 to 16x16. I made this change because the two games that currently use .vpp models, My Empire and My Colony 2, both use 16x16 models by default, as does the Voxel Playground utility. It only makes sense for Voxel Paint to conform to that default. I have also adjusted the maximum zoom out range, so you can zoom out on your models more than you could previously.
Finally, Voxel Paint now has a new file export mode called Precompile Model, which performs a majority of the operations that the My Empire or My Colony 2 game engines normally do before adding the model into the game, and saves that data into the actual .vpp file. The precompile export can take a minute or so depending on your device and will increase the file size by a factor of 2 or 3 (or more). The benefit is that it will reduce the time that one of the above mentioned games (or the Voxel Playground once it's updated) takes to load your model by 99%, which is good. If you are just working on small models or making personal artwork and do not care about rendering in My Colony 2, then you probably do not need to do a precompile export. On the other hand, if you are interested in My Colony 2 modding or creating Voxel Playground scenes, the precompile export is probably the way to go.
Anyway, the v1.7.0 update is live now on the Web and on the Ape Apps Launcher and should be hitting all other platforms over the course of the week. I hope you enjoy the changes, please leave feedback so that I can continue to improve the app, and stay tuned for more Voxel Paint updates!
#voxelpaint #mycolony2 #voxelplayground #myempire
First off, Voxel Paint now has, not one, but four pen tools available, accessable by either right-clicking on the pen tool icon, or selecting the pen tool again when you are already using one of the pens (for mobile access). Doing so will give you this new context menu where you can select which pen tool you are interested in using:
The Add Voxel tool is the same that it's always pen, the regular pen.
The new Fill Add Voxel tool accepts two clicks and will then fill in every cube in-between the first and second click. For instance, if you click on the top left corner of the painting and then the bottom left, you will get this:
Certainly a lot faster than single clicking on each individual tile!
The Paint Voxel tool is used for painting over, or changing the color of already existing voxels, handy for adding texture to a model or simply making changings without having to erase and redraw parts of your model.
Finally, the new Paint Emissive tool is used for quickly setting a group of voxels as emissive. You use it by "drawing" over them as with the Paint Voxel tool. It also allows mobile users to set voxels as emissive, as they couldn't before.
In order to keep all of the new tools straight, there is a new readout area on the bottom-right of the screen next to the coordinate readout that lets you know which tool you are currently using.
Aside from the new pens, there are a couple of more tools you will find in this release. Under the Image menu, there is a new Hollow Image wizard. This tool will go through your model and automatically remove all cubes that are not visible from the outside. This is a handy feature if you've just created a bunch of new voxels using the Fill Add Voxel tool and want to remove the excess in the center. Hollowing an image can greatly reduce your .vpp file size, as well as rendering performance.
When you first load up Voxel Paint, the default file size has been changed from 20x20 to 16x16. I made this change because the two games that currently use .vpp models, My Empire and My Colony 2, both use 16x16 models by default, as does the Voxel Playground utility. It only makes sense for Voxel Paint to conform to that default. I have also adjusted the maximum zoom out range, so you can zoom out on your models more than you could previously.
Finally, Voxel Paint now has a new file export mode called Precompile Model, which performs a majority of the operations that the My Empire or My Colony 2 game engines normally do before adding the model into the game, and saves that data into the actual .vpp file. The precompile export can take a minute or so depending on your device and will increase the file size by a factor of 2 or 3 (or more). The benefit is that it will reduce the time that one of the above mentioned games (or the Voxel Playground once it's updated) takes to load your model by 99%, which is good. If you are just working on small models or making personal artwork and do not care about rendering in My Colony 2, then you probably do not need to do a precompile export. On the other hand, if you are interested in My Colony 2 modding or creating Voxel Playground scenes, the precompile export is probably the way to go.
Anyway, the v1.7.0 update is live now on the Web and on the Ape Apps Launcher and should be hitting all other platforms over the course of the week. I hope you enjoy the changes, please leave feedback so that I can continue to improve the app, and stay tuned for more Voxel Paint updates!
#voxelpaint #mycolony2 #voxelplayground #myempire
#MyColony2 #VoxelPaint #VoxelModel #CommunityContents #MagicaVoxel #Scroll3D
HELLO GUYS!
Some months ago, inside the secret lab in the deep mountains.... Wait, wrong script.
Just a few monthes ago, our dev @bastecklein got hands onto creating a (sort of) next generation engine for upcoming games of Ape Apps. With some computer magic and pretty much hard efforts, the brand new engine Scroll3D was born, a new engine comes with elevation in terms of dimensions, from 2D to 3D.
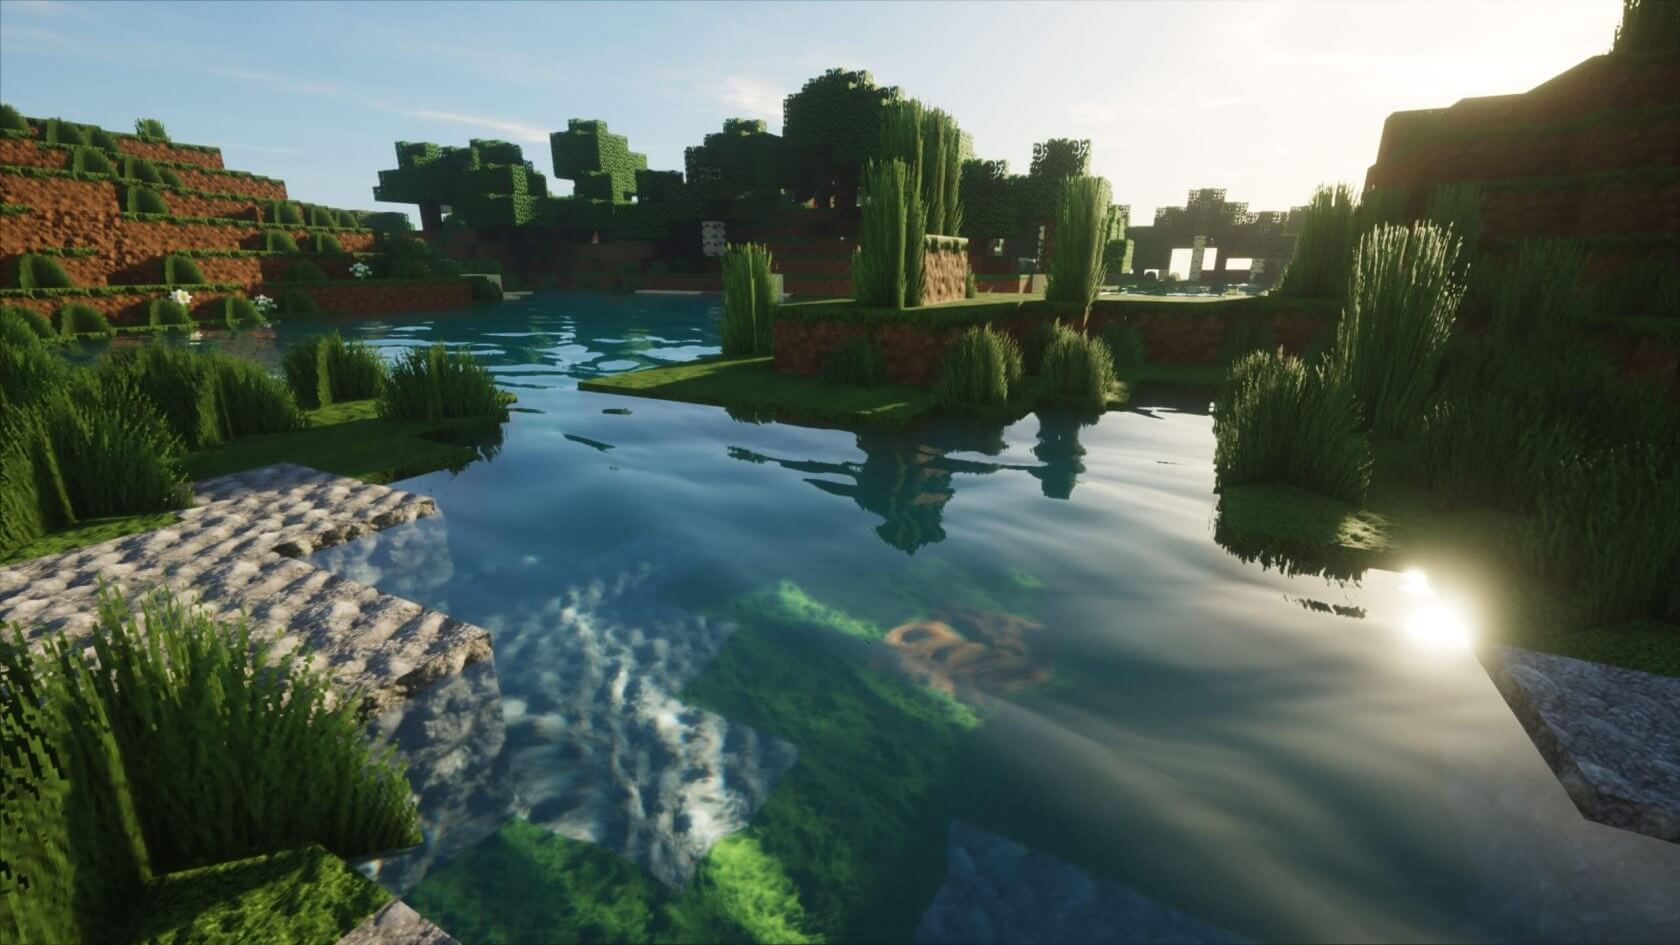
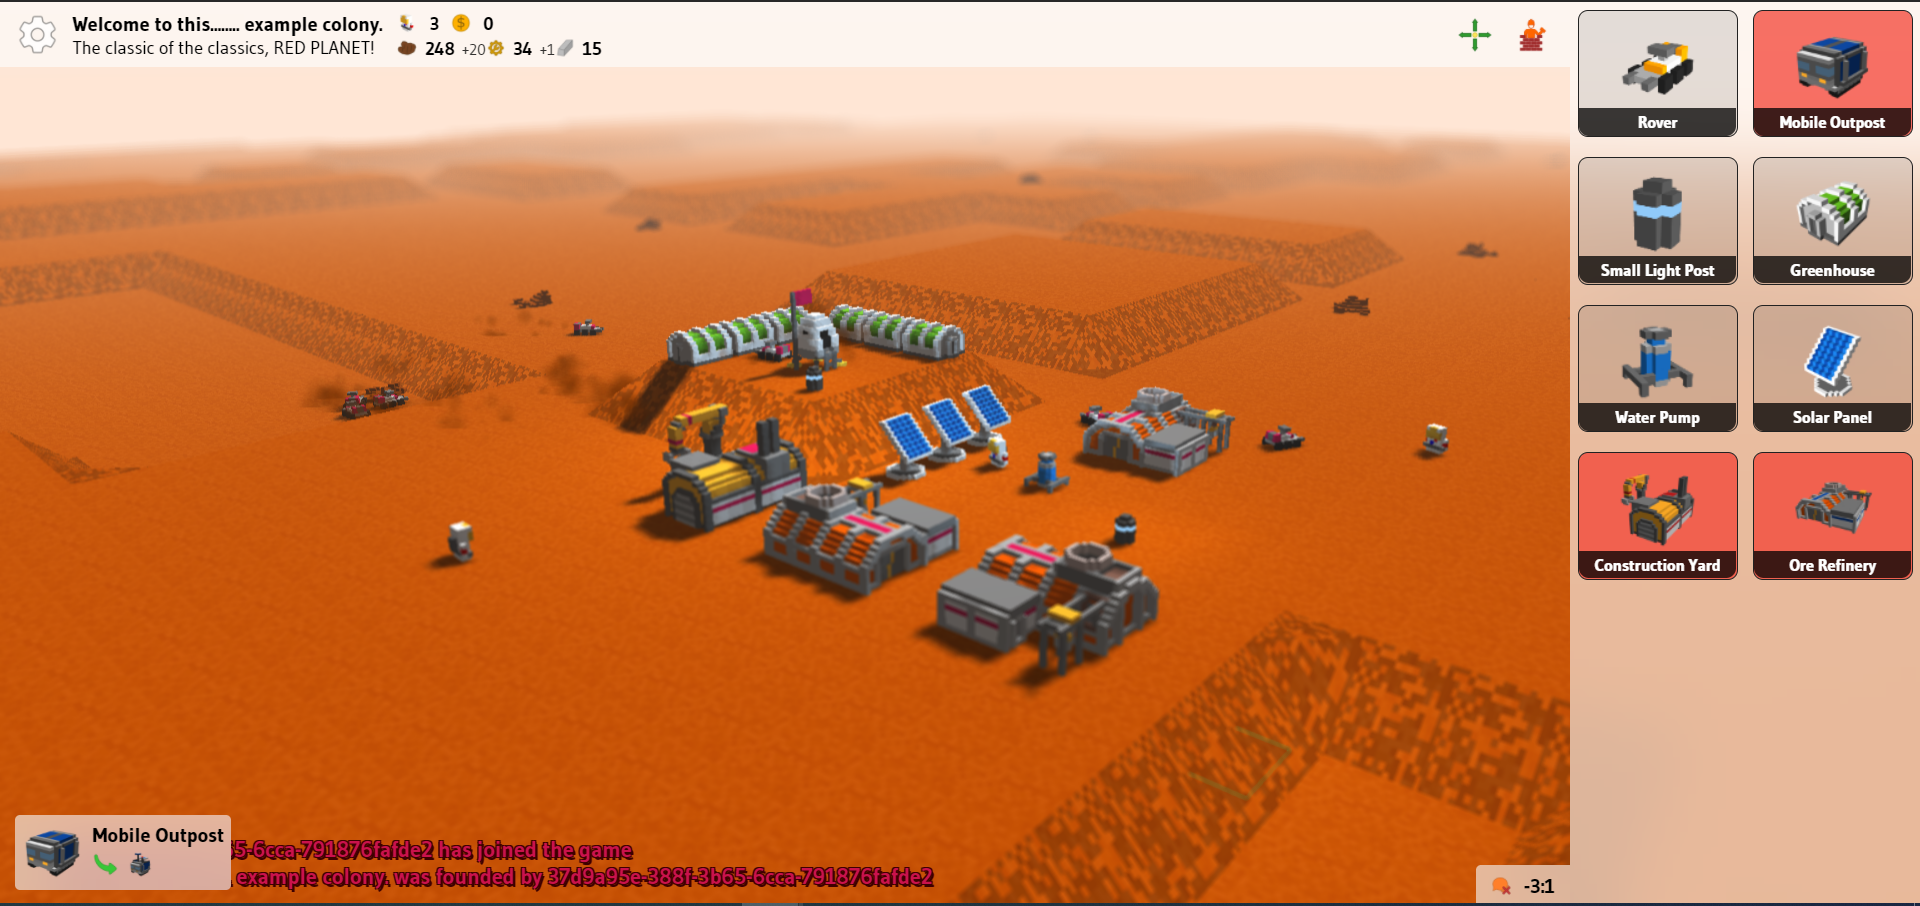
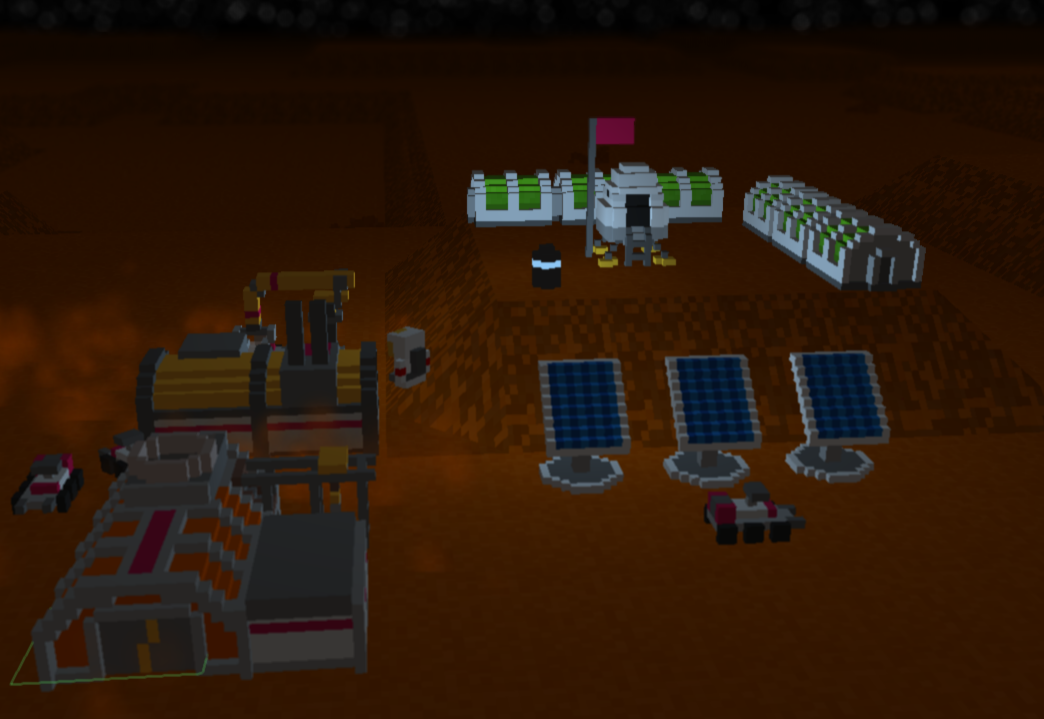
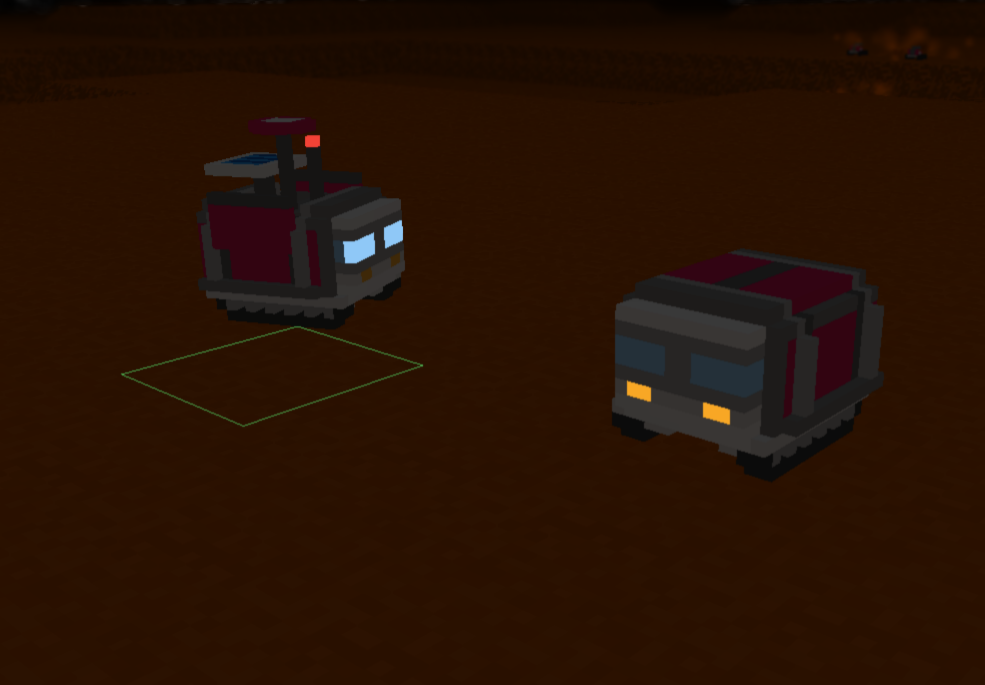
The currently under development My Colony 2 (MC2) is created using Scroll3D engine. So how it would look like? Here are some demonstrations from the recent in game footage.
Currently, the Scroll3D engine is capable of the followings, compared to the older Scroll2D engine:
The reason bastecklein adopted this style is because voxel models are generally easy to make. This is a good thing for people who would like to contribute to the graphical designs of game objects in game development, or create mods for the games - that is also one of the major features of My Colony 2.
Games using Scroll3D engine, including My Colony 2, use .vpp files for object graphics in the game. So how you can create the voxel models?
Bastecklein has also created another app for creating voxel models in .vpp format - Voxel Paint.
This is a dedicated app for creating .vpp models for any Ape Apps games using Scroll3D engine. A simple and easy-to-use app, it allows you to create simple, small voxel models. More importantly, it is available on many platforms, from your desktop computer to your mobile devices.
You can try out the app a bit on the embed window above.
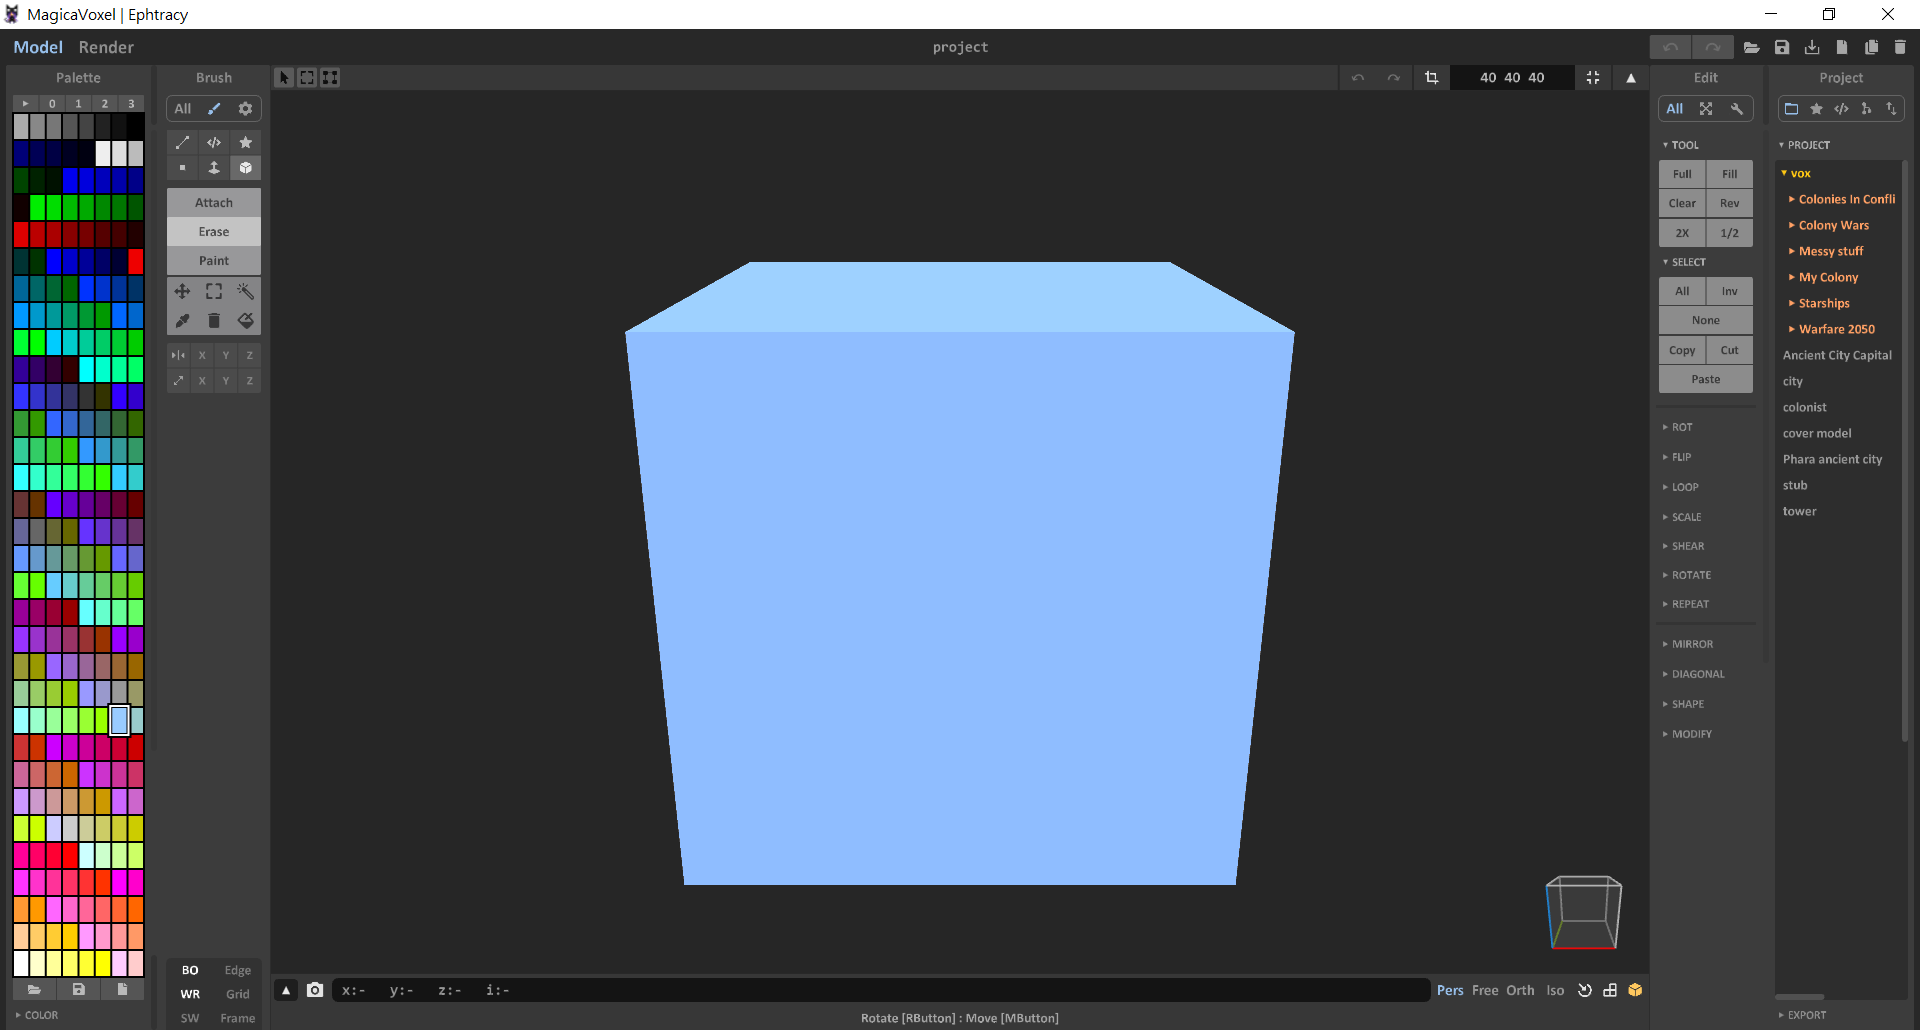
Voxel Paint can work in conjunction with another popular, totally free open source software that is also for creating voxel models, MagicaVoxel. MagicaVoxel, compared to Voxel Paint, has more convenient and advanced tools that can help making of voxel models easier, especially when you're trying to create larger models that would take days to make on Voxel Paint. However, it is so far only available on PC devices.
This is their official website where you will find the latest download version, and their Github page: https://ephtracy.github.io/
Models created using MagicaVoxel is in format of .vox, this format cannot be used in My Colony 2, it requires conversion in Voxel Paint using the Import .vox file function and then save it as usable .vpp files.
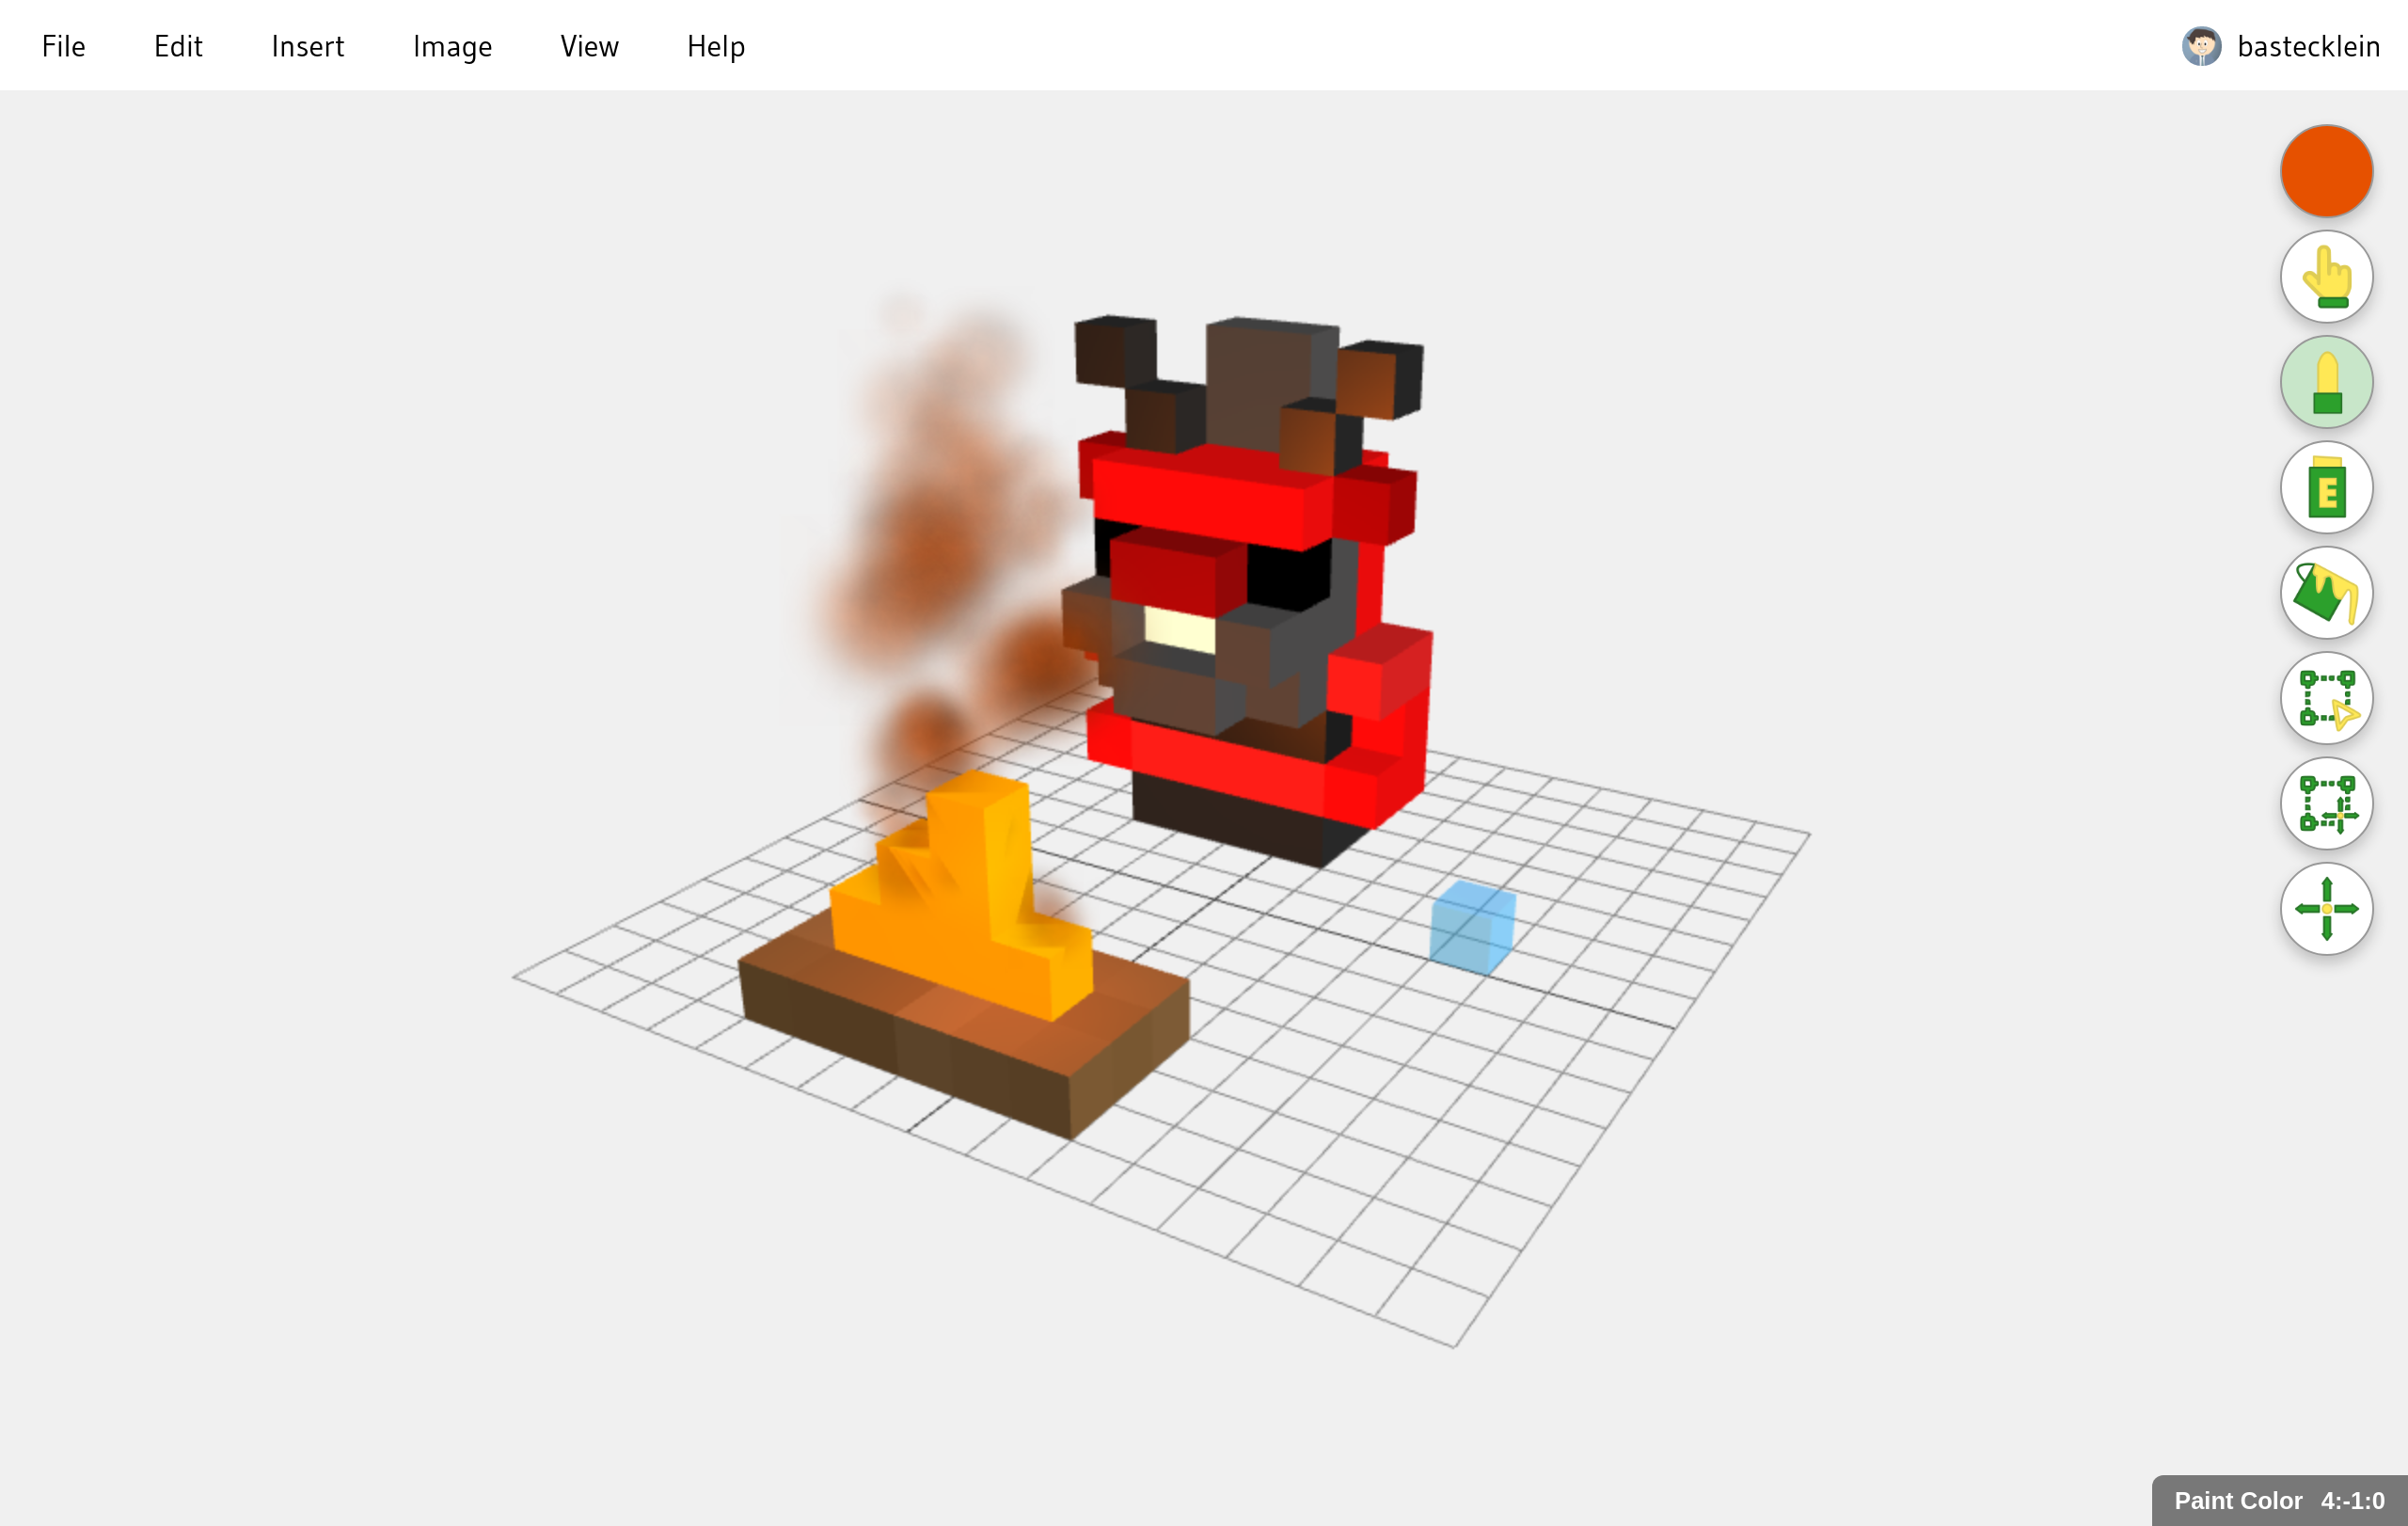
This is a screenshot of the user interface.
At this moment, the standard unit of a tile in Scroll3D engine is 16×16 voxels. Hence, when you're creating voxel models, please set canvas size/base area parameters as multiples of 16 (16×16, 32×32, 48×48, etc.) for proper designs.
Any voxel models in .vpp format you have created can be submitted on the Ape Apps forums, which upon submission of the post/comment the .vpp model preview can be rendered.
Just a few hours before this post, My Colony 2 reached v0.2.0 with a few basic gameplay features implemented successfully. It is far from completion, and some buildings need better models. However, there is also plentiful of space for adding shiny new good stuff and refining the current details, this is where bastecklein will need more cool thoughts, amazing ideas and fine suggestions from us. Of course, better or new voxel models!
As always:
You can help by EXPANDING IT.
HELLO GUYS!
Some months ago, inside the secret lab in the deep mountains.... Wait, wrong script.
Just a few monthes ago, our dev @bastecklein got hands onto creating a (sort of) next generation engine for upcoming games of Ape Apps. With some computer magic and pretty much hard efforts, the brand new engine Scroll3D was born, a new engine comes with elevation in terms of dimensions, from 2D to 3D.
The detailed story about creation of Scroll3D can be found in this post.
The currently under development My Colony 2 (MC2) is created using Scroll3D engine. So how it would look like? Here are some demonstrations from the recent in game footage.
Currently, the Scroll3D engine is capable of the followings, compared to the older Scroll2D engine:
- More realistic light rendering.
- Light emitting objects!
- A better representation of height and elevation.
- Diagonal movement of objects.
- 3 dimensional details for objects.
The reason bastecklein adopted this style is because voxel models are generally easy to make. This is a good thing for people who would like to contribute to the graphical designs of game objects in game development, or create mods for the games - that is also one of the major features of My Colony 2.
Games using Scroll3D engine, including My Colony 2, use .vpp files for object graphics in the game. So how you can create the voxel models?
Bastecklein has also created another app for creating voxel models in .vpp format - Voxel Paint.
This is a dedicated app for creating .vpp models for any Ape Apps games using Scroll3D engine. A simple and easy-to-use app, it allows you to create simple, small voxel models. More importantly, it is available on many platforms, from your desktop computer to your mobile devices.
You can try out the app a bit on the embed window above.
Voxel Paint can work in conjunction with another popular, totally free open source software that is also for creating voxel models, MagicaVoxel. MagicaVoxel, compared to Voxel Paint, has more convenient and advanced tools that can help making of voxel models easier, especially when you're trying to create larger models that would take days to make on Voxel Paint. However, it is so far only available on PC devices.
This is their official website where you will find the latest download version, and their Github page: https://ephtracy.github.io/
Models created using MagicaVoxel is in format of .vox, this format cannot be used in My Colony 2, it requires conversion in Voxel Paint using the Import .vox file function and then save it as usable .vpp files.
This is a screenshot of the user interface.
At this moment, the standard unit of a tile in Scroll3D engine is 16×16 voxels. Hence, when you're creating voxel models, please set canvas size/base area parameters as multiples of 16 (16×16, 32×32, 48×48, etc.) for proper designs.
Any voxel models in .vpp format you have created can be submitted on the Ape Apps forums, which upon submission of the post/comment the .vpp model preview can be rendered.
Just a few hours before this post, My Colony 2 reached v0.2.0 with a few basic gameplay features implemented successfully. It is far from completion, and some buildings need better models. However, there is also plentiful of space for adding shiny new good stuff and refining the current details, this is where bastecklein will need more cool thoughts, amazing ideas and fine suggestions from us. Of course, better or new voxel models!
As always:
You can help by EXPANDING IT.
Today I am releasing Voxel Paint v1.5.0, which should be hitting all platforms within the coming days. There are a handful of changes in this release, so let's take a look at what is new!
Firstly, I have made some improvements to transforms/moving selected and grouped voxels, which was pretty buggy before. I mean, it's still probably a bit buggy, but it is better now!
All of the menu/toolbar items have been reorganized and rearranged to better fit in with recent changes to the Web App Core host. Menu item icons have been changed as well. The help menu also now contains in-app links to the Keyboard Shortcuts guide and a download link for the three.js Loader for .vpp files (which is used by games such as My Empire and My Colony 2 to load .vpp files into usable models for 3d scenes using three.js).
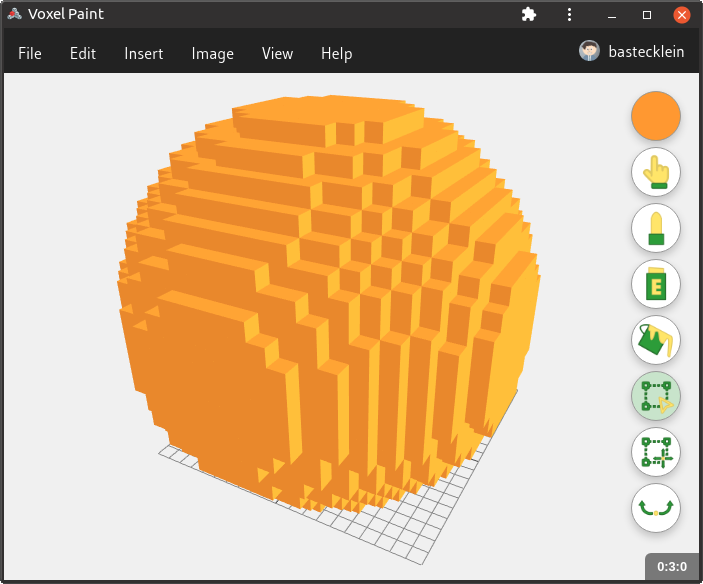
There is a new Insert menu that allows you to embed objects into your current painting. More objects will be coming soon, I was really wanting to test this out with today's release. The two items thus far are 'VPP Model' and 'Sphere.' VPP Model option lets you combine an existing VPP file into your current project. The imported data will be assigned as a single group which you can move and place as needed. The Sphere option will let you create a 3d voxel sphere with the specified radius and place it in your drawing. The sphere will take on whichever color is currently selected.
Speaking of the color selector, it has new options now. If you right-click on the color picker tool (long press on mobile), you will have options to add the current color to your favorites (or remove if it's already in favorites), or to change the currently grouped voxels into the selected color (if you have multiple voxels selected). This differs from the flood fill tool, as it will recolor all selected voxels, not just those of a similar color.
There is going to be another update to the app next month some time that will add more shape import options. I will also be adding an "Illuminated Voxel" option which will only really pertain to the upcoming My Colony 2 and the upcoming Voxel Playground applications. This will make a voxel unaffected by world lighting conditions, but since Voxel Paint does not currently include any special rendering effects itself, it will only be a useful function if you are making models for the above mentioned applications.
Speaking of Voxel Playground , it is a new web app I am working on to replace the previous VPP Loader Test application, which was never meant to be released to begin with, and was more or less a simple test bed to get the graphics rendering working correctly for My Empire.
Voxel Playground is not much more than VPP Loader Test at the moment, but all future development is going to be going into Voxel Playground, and VPP Loader Test will be discontinued soon, so if you were using VPP Loader Test, then please update your links:
https://www.apewebapps.com/voxel-playground/beta/
When I get the time to work on it, Voxel Playground is going to be a pretty cool application for making voxel artwork. It is going to let you fully customize your scenes, auto-generate terrain to your own specifications (or just have a flat plane), specify your own sky and lighting parameters, add your own lights, set animation frames, and more. I was actually going to be building it up so that I can use it to render a nice intro video for My Colony 2, so there is absolutely a lot of neat things coming soon to Voxel Playground, so keep an eye on it.
Anyway, that is all for this update. I know Voxel Paint hadn't been updated since July, but now that I am getting full swing into My Colony 2 development, Voxel Paint is going to need more regular updates to keep up with the requirements of the new game, so keep the suggestions and bug reports coming, and stay tuned for more!
Firstly, I have made some improvements to transforms/moving selected and grouped voxels, which was pretty buggy before. I mean, it's still probably a bit buggy, but it is better now!
All of the menu/toolbar items have been reorganized and rearranged to better fit in with recent changes to the Web App Core host. Menu item icons have been changed as well. The help menu also now contains in-app links to the Keyboard Shortcuts guide and a download link for the three.js Loader for .vpp files (which is used by games such as My Empire and My Colony 2 to load .vpp files into usable models for 3d scenes using three.js).
There is a new Insert menu that allows you to embed objects into your current painting. More objects will be coming soon, I was really wanting to test this out with today's release. The two items thus far are 'VPP Model' and 'Sphere.' VPP Model option lets you combine an existing VPP file into your current project. The imported data will be assigned as a single group which you can move and place as needed. The Sphere option will let you create a 3d voxel sphere with the specified radius and place it in your drawing. The sphere will take on whichever color is currently selected.
Speaking of the color selector, it has new options now. If you right-click on the color picker tool (long press on mobile), you will have options to add the current color to your favorites (or remove if it's already in favorites), or to change the currently grouped voxels into the selected color (if you have multiple voxels selected). This differs from the flood fill tool, as it will recolor all selected voxels, not just those of a similar color.
There is going to be another update to the app next month some time that will add more shape import options. I will also be adding an "Illuminated Voxel" option which will only really pertain to the upcoming My Colony 2 and the upcoming Voxel Playground applications. This will make a voxel unaffected by world lighting conditions, but since Voxel Paint does not currently include any special rendering effects itself, it will only be a useful function if you are making models for the above mentioned applications.
Speaking of Voxel Playground , it is a new web app I am working on to replace the previous VPP Loader Test application, which was never meant to be released to begin with, and was more or less a simple test bed to get the graphics rendering working correctly for My Empire.
Voxel Playground is not much more than VPP Loader Test at the moment, but all future development is going to be going into Voxel Playground, and VPP Loader Test will be discontinued soon, so if you were using VPP Loader Test, then please update your links:
https://www.apewebapps.com/voxel-playground/beta/
When I get the time to work on it, Voxel Playground is going to be a pretty cool application for making voxel artwork. It is going to let you fully customize your scenes, auto-generate terrain to your own specifications (or just have a flat plane), specify your own sky and lighting parameters, add your own lights, set animation frames, and more. I was actually going to be building it up so that I can use it to render a nice intro video for My Colony 2, so there is absolutely a lot of neat things coming soon to Voxel Playground, so keep an eye on it.
Anyway, that is all for this update. I know Voxel Paint hadn't been updated since July, but now that I am getting full swing into My Colony 2 development, Voxel Paint is going to need more regular updates to keep up with the requirements of the new game, so keep the suggestions and bug reports coming, and stay tuned for more!
Today I am putting the final touches on v1.6.0 of Voxel Paint, which should be hitting all available platforms in the coming days. This update adds support for new "emissive" voxels, which will be needed for setting up structure lighting on the upcoming My Colony 2.
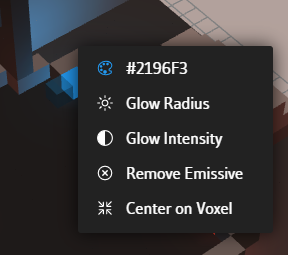
To use the new feature, you can now right-click on an individual voxel to access a new popup menu. When you turn on emissive for a voxel, you get new options for Glow Radius and Glow Intensity. These properties will determine how My Colony 2 (and other products) will ultimately render the lighting. There is currently no way to set this up on a touch screen device though.
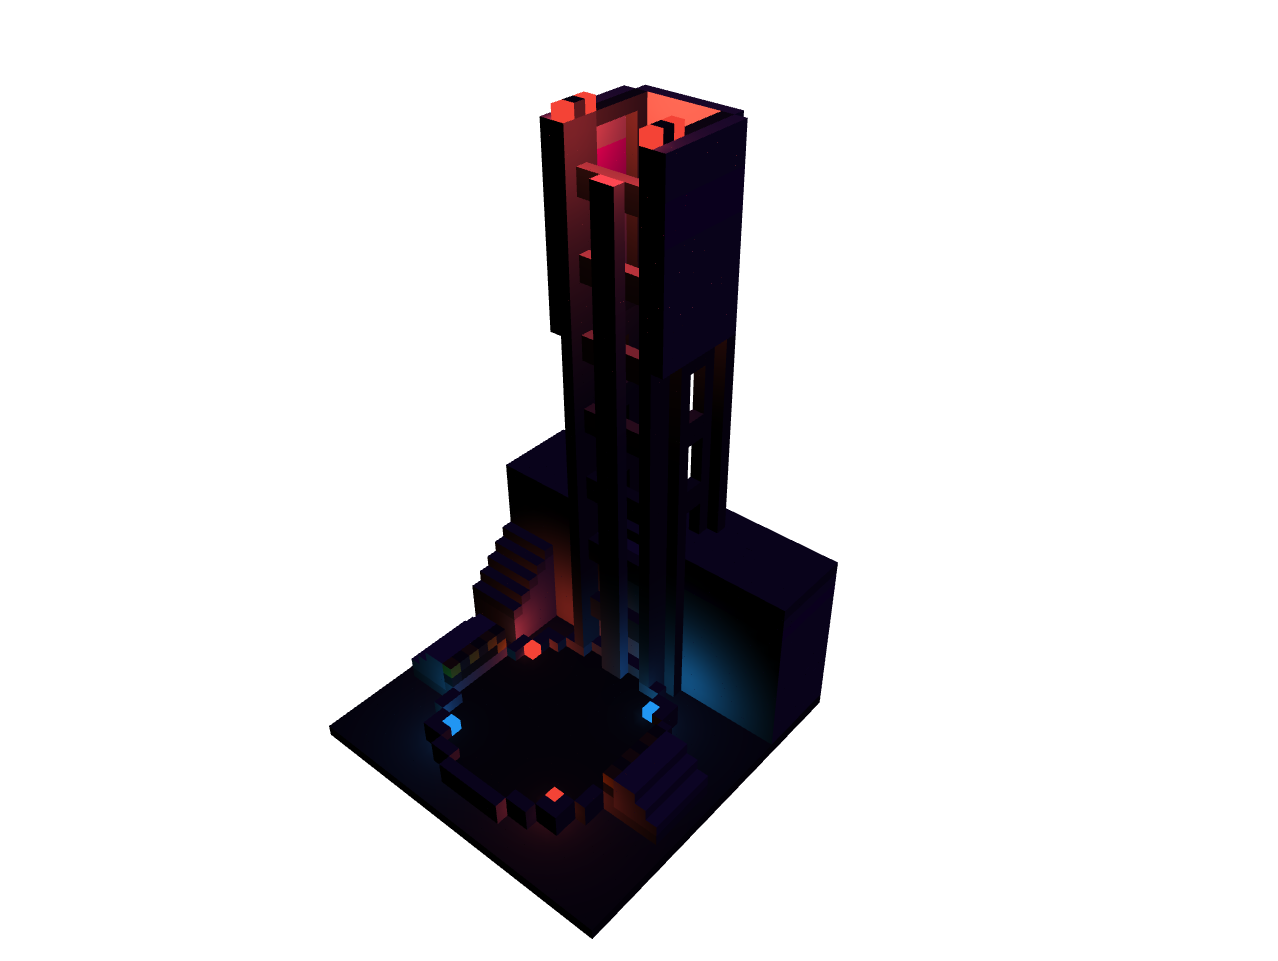
In the View dropdown menu, there is a new Scene Light Color setting which you can use to adjust the lighting in your scene, which is handy for testing out your emissive voxels. The scene lighting data is not saved to the actual .vpp model, but it is used when taking a render of your model. For example, I added a couple of lights to one of @GeneralWadaling 's MC2 models and turned down the lighting in order to test the feature:
Keep in mind that when creating models for My Colony 2, the voxel Glow Radius property is specified in voxels, whereas 16 voxels = 1 tile in the MC2 engine. Also, when you are setting scene brightness in the game, the light intensity level is roughly based on the color itself. For instance, a scene color of white (#ffffff) is like a room with the light turned on, where as a scene color of black (#000000) is basically the same as a white light with the intensity turned down to zero (hope that makes sense).
Some time ago, I believe @Sobeirannovaocc or perhaps someone else requested the ability to be able to pass raw .vpp data into Voxel Paint as an external parameter, and have the app render the file (as opposed to passing in a stored .vpp file url). This functionality is now present in Voxel Paint v1.6.0, and is used like this:
Parameter = emd={(json data here)}
You then base64 encode the above and pass it in as the parameter.
For example, suppose your VPP data looked like this:
The -AABLKTB- part of the URL above is optional, but it does remove the app toolbar, which you will want to do if you are hosting this in an iFrame and are trying to render a sample of the vpp data.
I do not know if browsers will place a limit on how large of a parameter one can pass in as an iFrame URL, but the few vpp files I have tried haven't had an issue, so your mileage may vary.
Finally, I have removed the camera rotation limit that stopped you from looking at the bottom side of a model, so you can now rotate the camera completely to the undersize of the scene.
The next step is to get the lights to actually show up in-game, so that is what I will be working on next. I need to make updates to the VPP Loader script to handle the new lights and emissive voxels, after which I will first implement the changes into the Voxel Playground application for testing.
In terms of My Colony 2, I think that buildings should be limited to between 0 and 1 lights. Above I posted a picture of one of Wadaling's structures with 8 active lights on it, and it does look cool, but that scenario would actually be a complete disaster for this type of game. Since My Colony 2 maps are all designed by the player, it is not possible to pre-compute light maps like would be done in a traditional 3d game. For this reason, I think that MC2 lighting should be limited to specific lighting structures, like the street lamp in MC1.
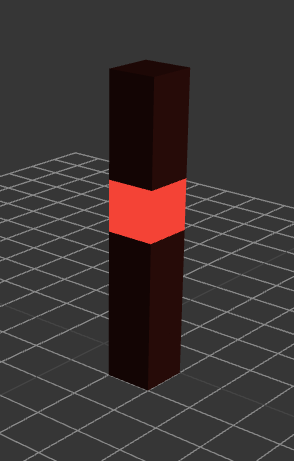
That said, a structure that has an emissive tile with a Glow Radius of 0 will not actually create a light in the MC2 engine. It will instead make that individual voxel unaffected by environment lighting. meaning the scene could be night time, but that voxel would still shine bright as day:
That said, I think it should still be used sparingly, as juts letting objects react to the general environment will probably generally work out alright.
So that is all for this Voxel Paint update. My next steps are to update the .vpp loader and to get the lighting engine working in the Voxel Playground app. I will post updates on the forum when those tasks are done. Beyond that, we will be ready to have a fully functional night time mode in My Colony 2. Exciting!
To use the new feature, you can now right-click on an individual voxel to access a new popup menu. When you turn on emissive for a voxel, you get new options for Glow Radius and Glow Intensity. These properties will determine how My Colony 2 (and other products) will ultimately render the lighting. There is currently no way to set this up on a touch screen device though.
In the View dropdown menu, there is a new Scene Light Color setting which you can use to adjust the lighting in your scene, which is handy for testing out your emissive voxels. The scene lighting data is not saved to the actual .vpp model, but it is used when taking a render of your model. For example, I added a couple of lights to one of @GeneralWadaling 's MC2 models and turned down the lighting in order to test the feature:
Keep in mind that when creating models for My Colony 2, the voxel Glow Radius property is specified in voxels, whereas 16 voxels = 1 tile in the MC2 engine. Also, when you are setting scene brightness in the game, the light intensity level is roughly based on the color itself. For instance, a scene color of white (#ffffff) is like a room with the light turned on, where as a scene color of black (#000000) is basically the same as a white light with the intensity turned down to zero (hope that makes sense).
Some time ago, I believe @Sobeirannovaocc or perhaps someone else requested the ability to be able to pass raw .vpp data into Voxel Paint as an external parameter, and have the app render the file (as opposed to passing in a stored .vpp file url). This functionality is now present in Voxel Paint v1.6.0, and is used like this:
Parameter = emd={(json data here)}
You then base64 encode the above and pass it in as the parameter.
For example, suppose your VPP data looked like this:
{"author":"bastecklein","size":6,"id":"bd8e637f-b5b4-6b59-b663-5363fdd820a0","voxels":[{"x":0,"y":0,"z":0,"c":"#f44336"},{"x":-1,"y":0,"z":0,"c":"#f44336"},{"x":0,"y":-1,"z":0,"c":"#2196F3"},{"x":-1,"y":-1,"z":0,"c":"#2196F3"}],"precompile":{}}
You would convert that object into a string and put emd= in front of it:emd={"author":"bastecklein","size":6,"id":"bd8e637f-b5b4-6b59-b663-5363fdd820a0","voxels":[{"x":0,"y":0,"z":0,"c":"#f44336"},{"x":-1,"y":0,"z":0,"c":"#f44336"},{"x":0,"y":-1,"z":0,"c":"#2196F3"},{"x":-1,"y":-1,"z":0,"c":"#2196F3"}],"precompile":{}}
You then base64 encode that entire string:ZW1kPXsiYXV0aG9yIjoiYmFzdGVja2xlaW4iLCJzaXplIjo2LCJpZCI6ImJkOGU2MzdmLWI1YjQtNmI1OS1iNjYzLTUzNjNmZGQ4MjBhMCIsInZveGVscyI6W3sieCI6MCwieSI6MCwieiI6MCwiYyI6IiNmNDQzMzYifSx7IngiOi0xLCJ5IjowLCJ6IjowLCJjIjoiI2Y0NDMzNiJ9LHsieCI6MCwieSI6LTEsInoiOjAsImMiOiIjMjE5NkYzIn0seyJ4IjotMSwieSI6LTEsInoiOjAsImMiOiIjMjE5NkYzIn1dLCJwcmVjb21waWxlIjp7fX0=And you can finally build your iFrame URL like this:
https://www.apewebapps.com/voxel-paint/launch/-AABLKTB-ZW1kPXsiYXV0aG9yIjoiYmFzdGVja2xlaW4iLCJzaXplIjo2LCJpZCI6ImJkOGU2MzdmLWI1YjQtNmI1OS1iNjYzLTUzNjNmZGQ4MjBhMCIsInZveGVscyI6W3sieCI6MCwieSI6MCwieiI6MCwiYyI6IiNmNDQzMzYifSx7IngiOi0xLCJ5IjowLCJ6IjowLCJjIjoiI2Y0NDMzNiJ9LHsieCI6MCwieSI6LTEsInoiOjAsImMiOiIjMjE5NkYzIn0seyJ4IjotMSwieSI6LTEsInoiOjAsImMiOiIjMjE5NkYzIn1dLCJwcmVjb21waWxlIjp7fX0=/embedded.htmlClick here to test it out, you should get something like this:
The -AABLKTB- part of the URL above is optional, but it does remove the app toolbar, which you will want to do if you are hosting this in an iFrame and are trying to render a sample of the vpp data.
I do not know if browsers will place a limit on how large of a parameter one can pass in as an iFrame URL, but the few vpp files I have tried haven't had an issue, so your mileage may vary.
Finally, I have removed the camera rotation limit that stopped you from looking at the bottom side of a model, so you can now rotate the camera completely to the undersize of the scene.
The next step is to get the lights to actually show up in-game, so that is what I will be working on next. I need to make updates to the VPP Loader script to handle the new lights and emissive voxels, after which I will first implement the changes into the Voxel Playground application for testing.
In terms of My Colony 2, I think that buildings should be limited to between 0 and 1 lights. Above I posted a picture of one of Wadaling's structures with 8 active lights on it, and it does look cool, but that scenario would actually be a complete disaster for this type of game. Since My Colony 2 maps are all designed by the player, it is not possible to pre-compute light maps like would be done in a traditional 3d game. For this reason, I think that MC2 lighting should be limited to specific lighting structures, like the street lamp in MC1.
That said, a structure that has an emissive tile with a Glow Radius of 0 will not actually create a light in the MC2 engine. It will instead make that individual voxel unaffected by environment lighting. meaning the scene could be night time, but that voxel would still shine bright as day:
That said, I think it should still be used sparingly, as juts letting objects react to the general environment will probably generally work out alright.
So that is all for this Voxel Paint update. My next steps are to update the .vpp loader and to get the lighting engine working in the Voxel Playground app. I will post updates on the forum when those tasks are done. Beyond that, we will be ready to have a fully functional night time mode in My Colony 2. Exciting!
Hello guys!
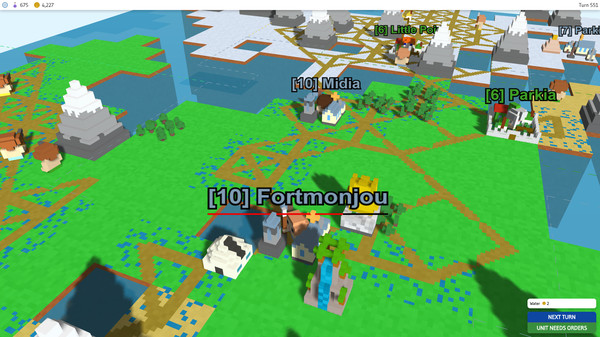
My Colony 2 (MC2) is currently under development which will utilize the brand new 3D engine.
In other word:
MY COLONY INTO 3D!
notes: It is a different game, not a direct successor of the current My Colony.
About the new 3D engine and Voxel Models
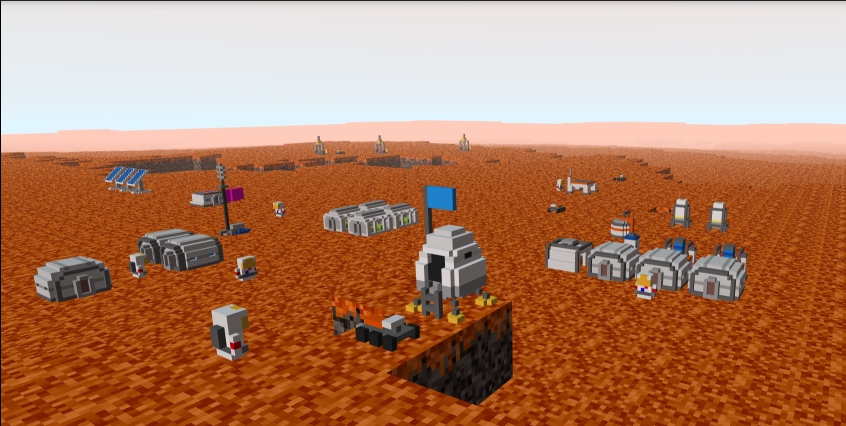
The first practical 3D engine utilisation was first tested in another game by @bastecklein, My Empire.
You'll found the models and textures in the new 3D engine looks quite blocky which the blockyness (...?) can be compared to Minecraft. The style is called Voxel.
One of the reasons for Bastecklein adopting voxel models is that it is easier for players to build their own model brick by brick, instead of entering hundreds of parameters to produce a single model.
This is a footage of My Empire. Looks promising, right?
MC2 and Voxel Models
One of the innovative change of MC2 over MC1 is the game supports more possibilities of modding, allowing players to customize their game from resources to buildings, from their attributes to their in-game appearance.
The render for colonists, rovers and buildings will also be voxel models - You can even use your own!
A demonstration of how the game could look like. Not an in-game render.
How to make your own voxel model
Bastecklein has also prepared an app dedicated for creating voxel models for new 3D games, including MC2, and their modding features:Voxel Paint.
Easy to use, it is accessible to anybody at different platforms, from your mobile to PC and laptops, either the web version or you can download the app if you wish to edit them offline.
Currently it is just a simple app, there are lots of rooms for improvement. If you think of something that can make Voxel Paint better, don't forget to drop your idea in the official Voxel Paint forum!
Hopefully you'll find this post helpful!
My Colony 2 (MC2) is currently under development which will utilize the brand new 3D engine.
In other word:
MY COLONY INTO 3D!
notes: It is a different game, not a direct successor of the current My Colony.
About the new 3D engine and Voxel Models
The first practical 3D engine utilisation was first tested in another game by @bastecklein, My Empire.
You'll found the models and textures in the new 3D engine looks quite blocky which the blockyness (...?) can be compared to Minecraft. The style is called Voxel.
One of the reasons for Bastecklein adopting voxel models is that it is easier for players to build their own model brick by brick, instead of entering hundreds of parameters to produce a single model.
This is a footage of My Empire. Looks promising, right?
MC2 and Voxel Models
One of the innovative change of MC2 over MC1 is the game supports more possibilities of modding, allowing players to customize their game from resources to buildings, from their attributes to their in-game appearance.
The render for colonists, rovers and buildings will also be voxel models - You can even use your own!
A demonstration of how the game could look like. Not an in-game render.
How to make your own voxel model
Bastecklein has also prepared an app dedicated for creating voxel models for new 3D games, including MC2, and their modding features:Voxel Paint.
Easy to use, it is accessible to anybody at different platforms, from your mobile to PC and laptops, either the web version or you can download the app if you wish to edit them offline.
Currently it is just a simple app, there are lots of rooms for improvement. If you think of something that can make Voxel Paint better, don't forget to drop your idea in the official Voxel Paint forum!
Hopefully you'll find this post helpful!
Today I am releasing Voxel Paint v1.9.0, which is available now on the web and the Ape Apps Launcher and should be hitting all other platforms over the coming days. This is a significant release "under the hood," as many core components of the application have been changed or entirely rewritten. This update also includes all Scroll3D engine updates from the latest builds of My Colony 2, new features, new keyboard shortcuts, tons of bug fixes, and a critical change that all users will need to be aware of. So let's take a look!
Let's start off with some new features that can be toggled on individual voxels now, including a Metallic effect, a Smoke Emitter effect, and one that has been requested from the very beginning, Voxel Opacity (transparency level)!
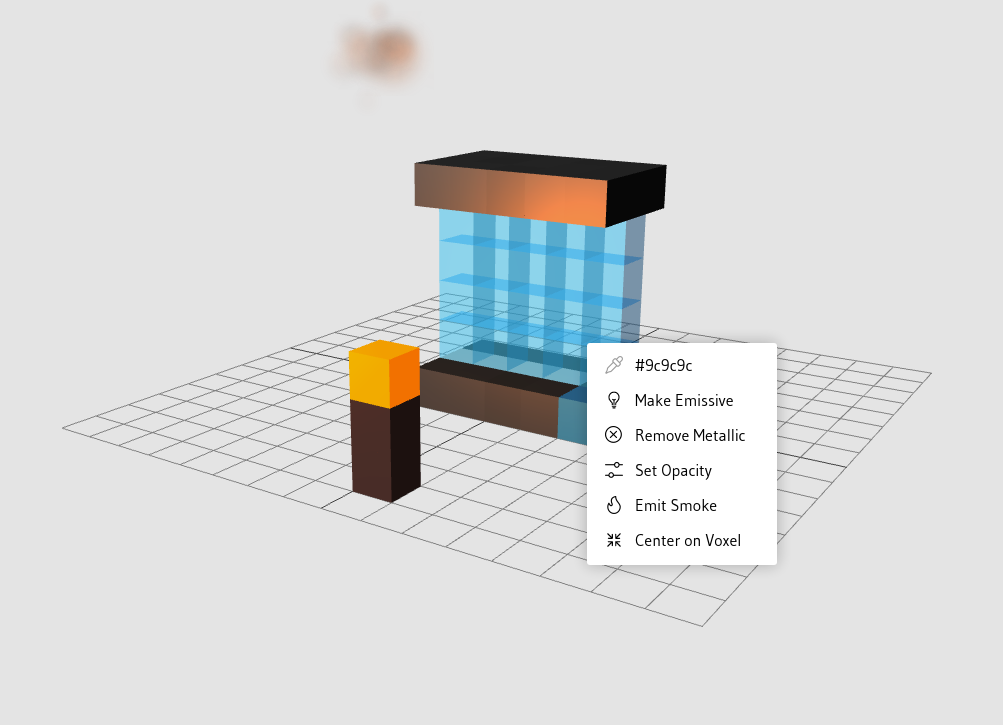
Now in the editor, you will notice that on semi-transparent voxels, you can see the edges of each cube, somewhat making the effect less cool. Rest assured that when these models are compiled, exported, and placed into games or the Voxel Playground app, large sheets of "glass" will look as they should. To correct it at runtime in the editor is too expensive of an operation.
The new per-voxel features are also available as "paint" features, which you can access by right-clicking or double-selecting the pen tool.
There is a critical change in this release that you will need to be aware of. Moving voxels outside of the paint area is now destructive! Models must now be built within the confines of the grid.
The Keyboard Shortcuts have been expanded, which you can see in detail on this thread, but I wanted to point out the new numpad functionality. Now when you have voxels selected, you can move them around freely using the keyboard numpad, and change their elevation using the numpad + and - keys. Pressing the numpad "enter" will finalize the move. This gives far greater control then trying to move voxels using the mouse or touch.
There are a ton of bug fixes in this release. You should notice that voxel moving and general manipulation is generally less "janky" than it was before. There is also a revamp on the rendering side, where voxels that are completely hidden (such as, inside of a giant cube) are no longer rendered, which greatly increases the performance of the application.
So that is about it for this update, but I hope you guys like it! My Colony 2, the Voxel Playground, and other apps that use .VPP models will have to be updated before they support all of the new visual effects, but that will be coming soon. I will be updating Voxel Playground next, and I will post a thread when it's released so you can test out all of the new cool looking effects on your models. Until then, let me know what issues you find, and what you would like to see added next!
#voxelpaint #voxelplayground #mycolony2
Let's start off with some new features that can be toggled on individual voxels now, including a Metallic effect, a Smoke Emitter effect, and one that has been requested from the very beginning, Voxel Opacity (transparency level)!
Now in the editor, you will notice that on semi-transparent voxels, you can see the edges of each cube, somewhat making the effect less cool. Rest assured that when these models are compiled, exported, and placed into games or the Voxel Playground app, large sheets of "glass" will look as they should. To correct it at runtime in the editor is too expensive of an operation.
The new per-voxel features are also available as "paint" features, which you can access by right-clicking or double-selecting the pen tool.
There is a critical change in this release that you will need to be aware of. Moving voxels outside of the paint area is now destructive! Models must now be built within the confines of the grid.
The Keyboard Shortcuts have been expanded, which you can see in detail on this thread, but I wanted to point out the new numpad functionality. Now when you have voxels selected, you can move them around freely using the keyboard numpad, and change their elevation using the numpad + and - keys. Pressing the numpad "enter" will finalize the move. This gives far greater control then trying to move voxels using the mouse or touch.
There are a ton of bug fixes in this release. You should notice that voxel moving and general manipulation is generally less "janky" than it was before. There is also a revamp on the rendering side, where voxels that are completely hidden (such as, inside of a giant cube) are no longer rendered, which greatly increases the performance of the application.
So that is about it for this update, but I hope you guys like it! My Colony 2, the Voxel Playground, and other apps that use .VPP models will have to be updated before they support all of the new visual effects, but that will be coming soon. I will be updating Voxel Playground next, and I will post a thread when it's released so you can test out all of the new cool looking effects on your models. Until then, let me know what issues you find, and what you would like to see added next!
#voxelpaint #voxelplayground #mycolony2
Today Voxel Paint is receiving a major upgrade to v2.0.0, which brings about major performance improvements, new features, and a new URL. This update represents a substantial rewrite of many parts of the application, so let's take a look at what is new!
The first major change is the fact that, like Voxel Playground did the other day, Voxel Paint has now moved to the voxelpaint.online domain. If you have the previous Ape Web Apps version of Voxel Paint installed on your device as a Progressive Web App ( PWA ), then you should uninstall/delete it and install the new version from the following URL:
https://voxelpaint.online/
Over the coming days, I will be updating this website to render uploaded .vpp files using the new version of the application.
There have also been massive performance improvements made with this version of the app, which should be particularly felt when working on large and complex VPP files.
The performance improvements are thanks to the fact that I have largely rewritten the application under the hood. Voxel Paint was the very first project I created with the Scroll3D engine, and my knowledge of working with WebGL has increased a little bit over the last couple of years, so the fruits of that knowledge should be felt in this Voxel Paint update.
Now, since I did basically rewrite the entire app, there are probably bugs that I missed in testing. For this reason, I am only releasing v2.0.0 on the Web (and the Ape Apps Launcher), at least until I am sure that it is functioning properly. The Android and iOS releases will remain on the previous version for the time being.
Moving on, Voxel Paint can now actually import paintings made by it's 2D sister application Pixel Paint. When you click on the Import menu and select Model, the file chooser should now let you select to import either a VPP, VOX, or PPP file. Importing a Pixel Paint file converts it into a standing 3D model.

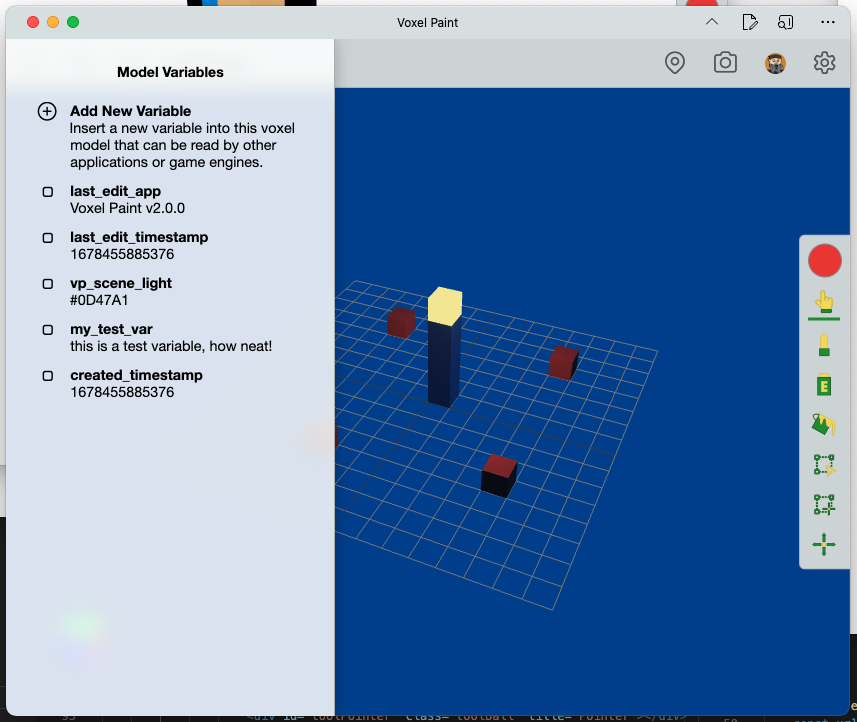
Nex up, custom user defined variables can now be embedded into .vpp files from within the app. There is a new Variable Editor included in the Edit menu where you can append any number of name/value pairs to your model, which can be utilized by various engines or applications. As of now, I am using the new system to store some meta data about the .vpp files, such as create/edit time stamps, the scene lighting color, etc. But I kept it generic and user-definable enough so that it can be easily used and expanded for multiple uses in the future.
I added a new feature to the context menu that appears when you right-click on a voxel called Select All Above.
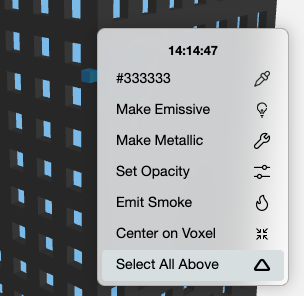
Here is a use case example. You can select all voxels above a point, and then use the up arrow button on your keyboard to shift all of the selected voxels upwards. This could potentially be used for doing things like making a building taller...
There have also been some smaller changes here and there. Obviously the theme is changed a little and the menus are reorganized a bit, but all of the options are still there. Clicking twice on the "selection mode" tool will now do a select-all function, and clicking on the eraser tool when you have voxels selected will now bulk delete them, two functions that were previously impossible on touch screen devices.
Anyway, update your PWA installs and your bookmarks to the new release of Voxel Paint, and do let me know in the forums here what issues you find. I did change a considerable amount of code in this update, so it is likely that there are some things I missed, so try it out, let me know, let me know what else you want added to the app, and stay tuned for more!
#voxelpaint
The first major change is the fact that, like Voxel Playground did the other day, Voxel Paint has now moved to the voxelpaint.online domain. If you have the previous Ape Web Apps version of Voxel Paint installed on your device as a Progressive Web App ( PWA ), then you should uninstall/delete it and install the new version from the following URL:
https://voxelpaint.online/
Over the coming days, I will be updating this website to render uploaded .vpp files using the new version of the application.
There have also been massive performance improvements made with this version of the app, which should be particularly felt when working on large and complex VPP files.
The performance improvements are thanks to the fact that I have largely rewritten the application under the hood. Voxel Paint was the very first project I created with the Scroll3D engine, and my knowledge of working with WebGL has increased a little bit over the last couple of years, so the fruits of that knowledge should be felt in this Voxel Paint update.
Now, since I did basically rewrite the entire app, there are probably bugs that I missed in testing. For this reason, I am only releasing v2.0.0 on the Web (and the Ape Apps Launcher), at least until I am sure that it is functioning properly. The Android and iOS releases will remain on the previous version for the time being.
Moving on, Voxel Paint can now actually import paintings made by it's 2D sister application Pixel Paint. When you click on the Import menu and select Model, the file chooser should now let you select to import either a VPP, VOX, or PPP file. Importing a Pixel Paint file converts it into a standing 3D model.
Nex up, custom user defined variables can now be embedded into .vpp files from within the app. There is a new Variable Editor included in the Edit menu where you can append any number of name/value pairs to your model, which can be utilized by various engines or applications. As of now, I am using the new system to store some meta data about the .vpp files, such as create/edit time stamps, the scene lighting color, etc. But I kept it generic and user-definable enough so that it can be easily used and expanded for multiple uses in the future.
I added a new feature to the context menu that appears when you right-click on a voxel called Select All Above.
Here is a use case example. You can select all voxels above a point, and then use the up arrow button on your keyboard to shift all of the selected voxels upwards. This could potentially be used for doing things like making a building taller...
There have also been some smaller changes here and there. Obviously the theme is changed a little and the menus are reorganized a bit, but all of the options are still there. Clicking twice on the "selection mode" tool will now do a select-all function, and clicking on the eraser tool when you have voxels selected will now bulk delete them, two functions that were previously impossible on touch screen devices.
Anyway, update your PWA installs and your bookmarks to the new release of Voxel Paint, and do let me know in the forums here what issues you find. I did change a considerable amount of code in this update, so it is likely that there are some things I missed, so try it out, let me know, let me know what else you want added to the app, and stay tuned for more!
#voxelpaint
I have begun designing the upcoming Scroll3d engine, which is a WebGL based replacement for my current Scroll2d game engine that powers My Colony, Antiquitas, My Land, My Starship, Epic Adventure, Gone Rogue, Hell and Back, Colony Wars, My Empire, etc. Scroll3d is my "next generation" rendering engine that will be powering My Colony 2 along with my next batch of games and graphical applications over the coming years, so it is a long term project.
I am designing Scroll3d to be similar API-wise to Scroll2d, the primary difference being that it adds a Z axis to the current X/Y axis. But I wanted the mouse/touch/gamepad interactions to work in a similar way to Scroll2d, because the current engine is fairly easy to navigate at this point.
To that end, I have created the first app and tech demo for the new Scroll3d engine, Voxel Paint, which you can check out at Ape Web Apps here: https://www.apewebapps.com/voxel-paint/
Voxel Paint is just a simple 3d drawing app, nothing special. But I needed something to start putting the basics into the new engine. Voxel Paint demonstrates that the engine now has X, Y, and Z axis. I also have most of the usual mouse and touch interactions working, including panning and zoom, utilizing both mouse wheel and touch pinch-to-zoom. Scroll3d also adds an additional interaction which is Rotate.
Anyway, you can check out the beginnings of the new engine by giving Voxel Paint a try. There is still a lot to do on the engine of course, but you can start to see the basics taking shape.
While working on Voxel Paint, I began to consider writing a WebGL loader that would take Voxel Paint save files and turn them into geometries that can be used in games, support for which would be baked right into Scroll3d. Using this, if I wanted to give MC2 a pixelated look, it would be easy for players/modders to just whip out a custom voxel model and import it into the game. Anyway, I would have to see how it looks first though, I might not like the pixelated look.
An exciting new feature is now working in the Voxel Paint Progressive Web App (PWA) that allows you to launch and open .vpp files by simply double-clicking them on your computer, as would work with a normal installed desktop application. Voxel Paint now supports *.vpp file type association, but there are a couple of things you need to do first in order to set it up.
The first requirement is that you need to enable the new File Handling API in the experimental features of either Chrome or Edge. Browse to either chrome://flags or edge://flags (respectively) and find and enable the #file-handling-api flag.
Next, Voxel Paint has to be "installed" on your system as a PWA. This is simple enough. If you browse to the Voxel Paint web app (https://www.apewebapps.com/voxel-paint/), you will see an Install or App Available notice in the right side of the address bar. There might also be an Install option in the Help dropdown menu. Once you do this, Voxel Paint will look and behave as a normal application on your system.
Although still in the experimental stages, the File Handling API is a great new feature coming to modern browsers that will go a long way towards giving PWA's feature parity with many existing desktop applications, and I look forward to implementing the file associations feature with other apps in my catalog over the coming months!
#voxelpaint
This morning I have released the 2.5.0 update for Voxel Paint, which includes a new bi-directional integration with Ape Chat. This feature is new for both apps and will be expanded and improved in the months ahead, but let's take a look at what it does right now!

Now when you click on the toolbar's top-right settings icon, you will see two new options (only available if you are signed in with an Ape Apps Account), Voxel Paint Chat and Set Chat Channel. If you click on Voxel Paint Chat, it will open the new embedded Ape Chat sidebar that will be familiar to players of My Colony and My Colony 2. The Set Chat Channel option lets you customize which Ape Chat channel is used by the app (the default is #voxelpaint, but you can use anything you want, like #mc2-voxeling for instance).
While the Ape Chat sidebar is open, two brand new features are unlocked that tie directly to chat. First, if you click on the toolbar camera icon which is normally used to save a .png of your model, you will now get a new dropdown menu with a Post to Chat option. This will still take a .png of your model as before, but instead of exporting to your device, it will post it directly into whatever Ape Chat channel you are currently signed in to.
Similar to posting .png images, the folder menu contains a new Post to Chat export option, which does the same thing, except it uploads the full model instead of a render. The render can then be viewed, manipulated and downloaded by users in the Ape Chat client.
These features are early and there are still some issues, particularly on the Ape Chat side. For example, currently the Download button in the in-chat renderer seems to be showing a plain text version of your model instead of actually downloading it. The header above the model is not formatted well for the slide-out chat side. It also messes with mouse wheel scrolling. So if you notice any of the aforementioned issues, you do not need to report them, as I already am aware!
Moving forward, I plan to expand this further. For instance, in the model renderer in the slide-out chat frame, I want to have a button that lets you instantly import the model you are looking at into your Voxel Paint workspace. That way if multiple people are in the chat, you can sort of collaborate on something. Someone could make a part of the model, post it, you could click on the import button and it would paste it in selected, and you can move it to where you need it to be.
Over the next day or two, these features will also be making their way to Pixel Paint. I probably will not make a new post about them since they will work largely in the same way that they do in Voxel Paint, but keep a look out for them in the coming days.
That is it for this update to Voxel Paint. I plan to improve the integration on both the Voxel Paint and Ape Chat side of things, so if you have ideas on how to make it even cooler, let me know!
https://voxelpaint.online/
#voxelpaint #pixelpaint
With the recently released v1.2.0 update for Voxel Paint, there are now some new keyboard shortcuts you should know of to help you with your voxel art. This thread will be updated as new shortcuts are added.
Alt
When using the select voxel tool, holding down on the Alt key will also select all voxels of the same color of the voxel you selected.
Shift
Ctrl + M: Make all selected voxels metallic
Ctrl + E: Make all selected voxels emissive
Ctrl + O: Make all selected voxels windows (50% opacity)
d: While in select mode, pressing the "d" key will duplicate the current selection, creating a copy.
g: While in select mode, pressing "g" will group the selected voxels. After this, you can click on one of the voxels in the group to select that group again.
u: Ungroups the selected voxels.
r: When you are using the Move Tool or pasting duplicated voxels, pressing "r" will rotate the voxels you are moving by 90 degrees.
f: When you are using the Move Tool or pasting duplicated voxels, pressing "f" will flip the selected voxels. Hold down on the shift key to flip in the other way.
Escape: The escape key will deselect all voxels and also cancel a pending voxel duplication operation.
Numpad
When voxels are selected, you can move them in any direction using the keyboard numpad. The numpad + and - buttons will change their elevation, and the numpad Enter will apply all changes.
Alt
When using the select voxel tool, holding down on the Alt key will also select all voxels of the same color of the voxel you selected.
Shift
- Pen and Eraser Tool: Holding shift while using the pen or eraser will activate free draw/erase mode.
- Select Tool: When using the Select Tool, holding down on Shift before you click on a voxel will do a "Flood Select" operation and select all connecting voxels.
Ctrl + M: Make all selected voxels metallic
Ctrl + E: Make all selected voxels emissive
Ctrl + O: Make all selected voxels windows (50% opacity)
d: While in select mode, pressing the "d" key will duplicate the current selection, creating a copy.
g: While in select mode, pressing "g" will group the selected voxels. After this, you can click on one of the voxels in the group to select that group again.
u: Ungroups the selected voxels.
r: When you are using the Move Tool or pasting duplicated voxels, pressing "r" will rotate the voxels you are moving by 90 degrees.
f: When you are using the Move Tool or pasting duplicated voxels, pressing "f" will flip the selected voxels. Hold down on the shift key to flip in the other way.
Escape: The escape key will deselect all voxels and also cancel a pending voxel duplication operation.
Numpad
When voxels are selected, you can move them in any direction using the keyboard numpad. The numpad + and - buttons will change their elevation, and the numpad Enter will apply all changes.
Voxel Paint has just been updated to v1.8.0 with a few shiny new features for your enjoyment. For starters, My Tokens have now invaded Voxel Paint!
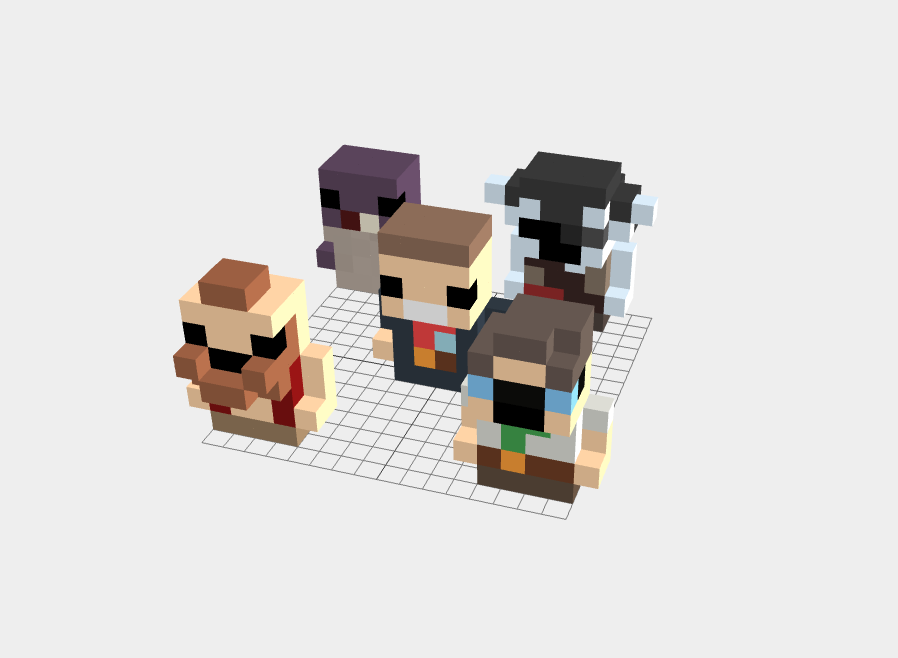
If you are signed into Voxel Paint with your Ape Apps Account and you have some My Tokens characters saved to your account as well, they will now be available to import into your paintings from the Insert menu. The latest version of My Tokens also lets you just export .vpp files directly, but this is a shortcut method.
Next up, your projects can now be exported as .obj files. This is cool for several reasons, one of which is that the .obj format is common in 3D printing, meaning you could probably print your Voxel Paint creations to a 3D printer. I don't personally have one to test this out with, but I was able to open an exported .obj in an alternate application, so I know that the files I am generating are standard.
Finally, the default camera mode has switched from Rotate to Pan. I have also made it so that using the right-mouse button will trigger the camera mode opposite to the primary selected mode (like in My Colony 2). What this means, is that you can click/drag using the left mouse button to pan, and using the right mouse button to rotate. You can also toggle the mode from the toolbar and the opposite will be true. If that sounds confusing, just try it out yourself and you will see that it is not confusing at all.
Anyway, that is all for today's Voxel Paint update. If any of you happen to have a 3D printer and end up printing out a Voxel Paint creation, post it in the forum because I'd love to see how it comes out (or if it just fails)!
#voxelpaint #mytokens
Ok, so I know I just updated My Tokens a few days ago, but since I was already in "My Tokens Mode," I decided to keep at it and introduce an entire new class of Token character, the Minecraft-inspired Blockhead Token!
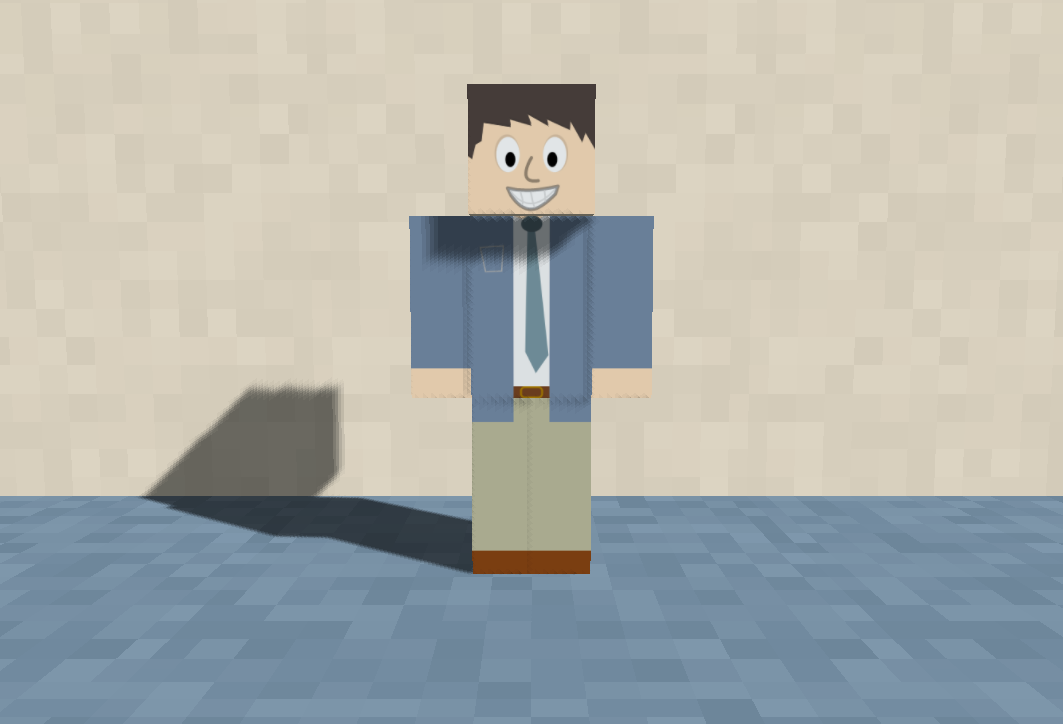
Available now in My Tokens v2.2.0 (which should be hitting all platforms soon), the new Blockhead Token is the second 3D modeled token class, and the first 3D modeled token to be textured. The texturing in the Blockhead Tokens is superior to that of the original two 2D token classes, as the textures are all stored as small .svg files that are downloaded from the server to the client's device and then compiled at runtime at any resolution, meaning the textures can be extremely sharp when compared to the existing My Token classes.
There are individual .svg files for each component, which the client device will layer on top of each other before creating the final scaled texture, when is then mapped onto the Token model. The token texture uses the following layout:

I am thinking of also making a way to export the final compiled layout of a Blockhead Token, or even letting people upload their own custom skins into My Tokens, although it wouldn't work with the existing Token classes. And since the Blockhead Tokens are ratio-equivalent to a Minecraft character, I was thinking I could even add an option to compile your created Token as a Minecraft skin that you could export and use in Minecraft. Of course, Minecraft skin textures are a lot lower resolution than a My Token character, so things might not look very good when scaled down like that, so we will see.
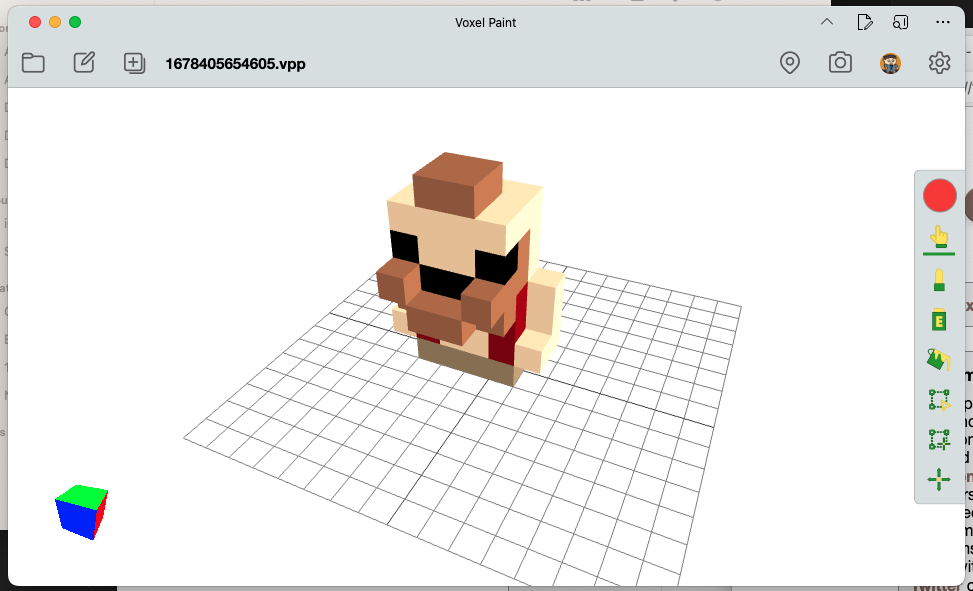
The two new 3D style of Tokens are significantly easier to maintain and create new parts for than the two original 2D versions. Of course, the Mini Voxel token is by far the easiest to create new content for, as it's just a few blocks in Voxel Paint at extremely low resolution, but the new Blockhead model is pretty easy as well. Just to show the complexity of the different types, let's look at the spacesuit overshirt model for the different Token types. Here it is for the mini-Voxel token:
Pretty basic. Here is the same Token part for the new Blockhead token:

A little more complicated, but still not bad. Now here is the sheet for the two original Token types (they are both combined into the same file):

You probably can't even see anything without downloading the file and zooming way in, but I have to draw different animation frames for each direction a Token can be facing. It takes forever.
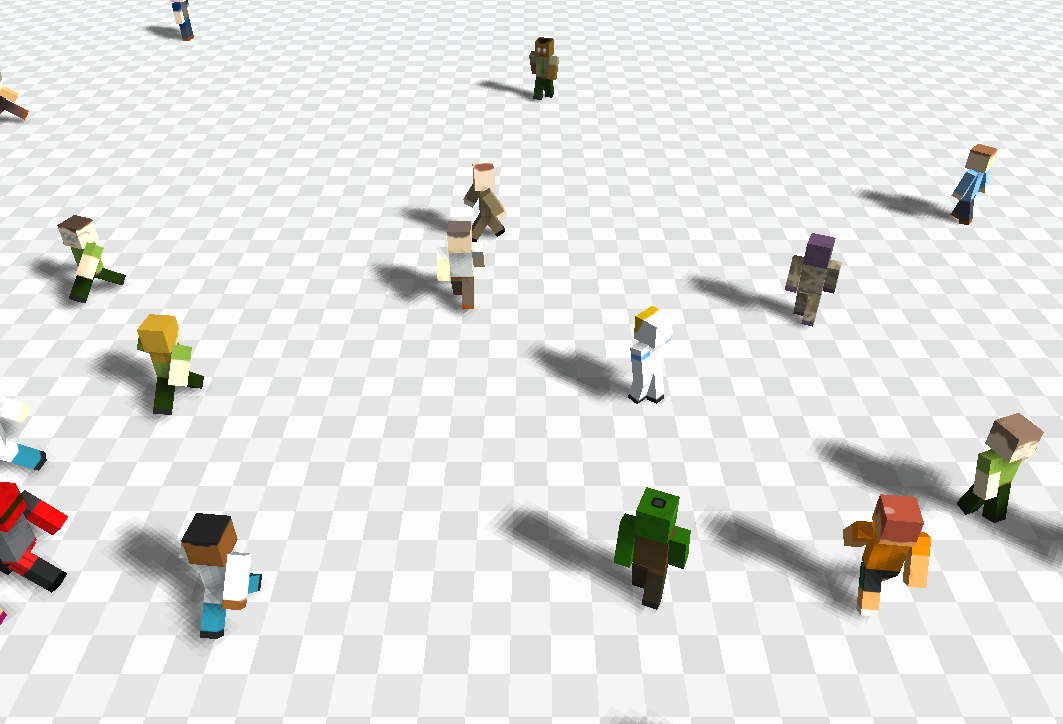
Sadly when adding new Token parts, I still have to maintain the two original Token types. Going forward though, new games are going to be using the new 3D token models instead of the old 2D models. The first game to use a 3D token will be Token Kart, which I have been working on off-and-on over the months and will be using the Mini Voxel Tokens. I might also allow Voxel tokens to appear as colonists in some My Colony 2 maps, such as the Water World, which theoretically has an atmosphere they can breathe. As for the new Blockhead tokens, I want to create the next generation of the Death 3D engine with better performance and more capabilities, and the ability to use Blockhead tokens as characters. I am going to use the engine to create a 3D adaptation of the Deimos trilogy. I am also going to make a Gone Rogue 2, which will either use the Voxel or Blockhead tokens as characters, I haven't decided which yet.
Anyway, the new My Tokens update should be available soon on all platforms (available now on the Web or the Launcher), so check it out and let me know what you think!
#mytokens #mycolony2 #voxelpaint
Available now in My Tokens v2.2.0 (which should be hitting all platforms soon), the new Blockhead Token is the second 3D modeled token class, and the first 3D modeled token to be textured. The texturing in the Blockhead Tokens is superior to that of the original two 2D token classes, as the textures are all stored as small .svg files that are downloaded from the server to the client's device and then compiled at runtime at any resolution, meaning the textures can be extremely sharp when compared to the existing My Token classes.
There are individual .svg files for each component, which the client device will layer on top of each other before creating the final scaled texture, when is then mapped onto the Token model. The token texture uses the following layout:
I am thinking of also making a way to export the final compiled layout of a Blockhead Token, or even letting people upload their own custom skins into My Tokens, although it wouldn't work with the existing Token classes. And since the Blockhead Tokens are ratio-equivalent to a Minecraft character, I was thinking I could even add an option to compile your created Token as a Minecraft skin that you could export and use in Minecraft. Of course, Minecraft skin textures are a lot lower resolution than a My Token character, so things might not look very good when scaled down like that, so we will see.
The two new 3D style of Tokens are significantly easier to maintain and create new parts for than the two original 2D versions. Of course, the Mini Voxel token is by far the easiest to create new content for, as it's just a few blocks in Voxel Paint at extremely low resolution, but the new Blockhead model is pretty easy as well. Just to show the complexity of the different types, let's look at the spacesuit overshirt model for the different Token types. Here it is for the mini-Voxel token:
Pretty basic. Here is the same Token part for the new Blockhead token:
A little more complicated, but still not bad. Now here is the sheet for the two original Token types (they are both combined into the same file):
You probably can't even see anything without downloading the file and zooming way in, but I have to draw different animation frames for each direction a Token can be facing. It takes forever.
Sadly when adding new Token parts, I still have to maintain the two original Token types. Going forward though, new games are going to be using the new 3D token models instead of the old 2D models. The first game to use a 3D token will be Token Kart, which I have been working on off-and-on over the months and will be using the Mini Voxel Tokens. I might also allow Voxel tokens to appear as colonists in some My Colony 2 maps, such as the Water World, which theoretically has an atmosphere they can breathe. As for the new Blockhead tokens, I want to create the next generation of the Death 3D engine with better performance and more capabilities, and the ability to use Blockhead tokens as characters. I am going to use the engine to create a 3D adaptation of the Deimos trilogy. I am also going to make a Gone Rogue 2, which will either use the Voxel or Blockhead tokens as characters, I haven't decided which yet.
Anyway, the new My Tokens update should be available soon on all platforms (available now on the Web or the Launcher), so check it out and let me know what you think!
#mytokens #mycolony2 #voxelpaint
GeneralWadaling said:One question, if the building is a voxel model, do 1 tile in MC2 = 10×10 voxels?
I would like to have a reference of how large the canvas should be, so can have some properly scaled voxel building models. :p
Yes, if we went with the Voxel model, that was actually my exact thought. 10x10 in Voxel Paint would represent 1 in-game tile in MC2. Nice easy round number.
The canvas size in Voxel Paint would need to be set accordingly, to some multiple of 10, as the loader would center the model based on the 0,0 position in the grid, which is always in the middle of the Voxel Paint grid.
Voxel Paint v2.4.0 is now available with a couple of handy QOL features on board, so let's take a look at what is new!
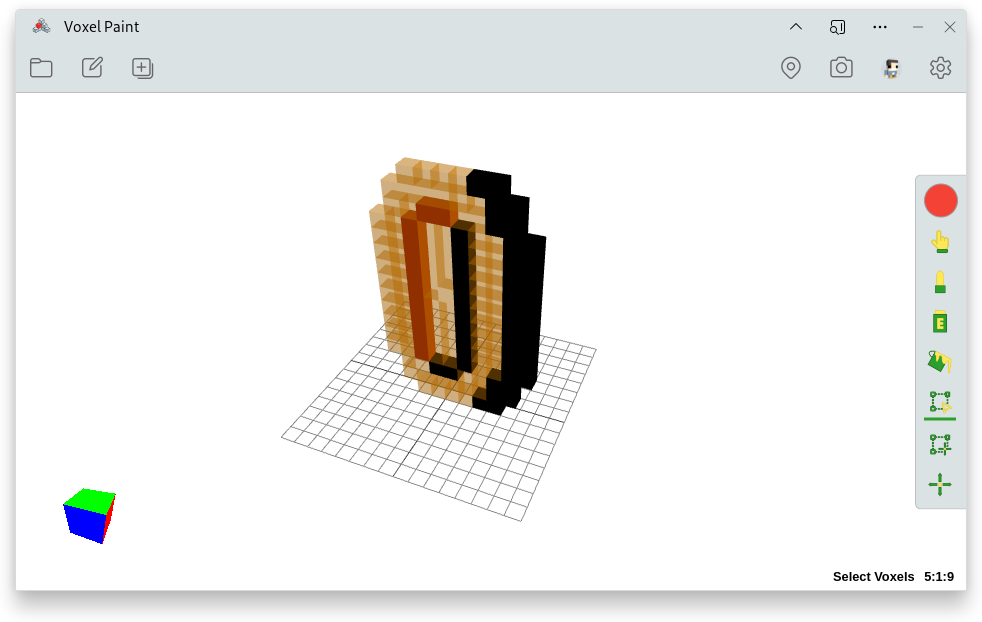
For starters, I have added the new color-only flood select function. Now if you are on the voxel selection tool and then click on a voxel while holding down the alt key, it will select all adjacent voxels of the same color. This is helpful for making things like windows in MC2 models, because you can also use the Ctrl+E keyboard shortcut to make all selected voxels emissive.
I have also added a function to flip selected voxels. When you have made a multi voxel selection, you can press the F key to flip everything. If you hold down on shift too, you can flip voxels in another direction.
I have also fixed an issue where exporting a .obj model was not working.
I realized that I have not updated the keyboard shortcuts thread in a long time, and things have been added over the last couple of years that are not documented, so I will be updating that thread shortly. I also will be posting the latest version of the .vpp loader for three.js script, as it is very much out of date too.
Anyway, let me know what issues you find, and thanks for using Voxel Paint!
https://voxelpaint.online/
#voxelpaint
Since Voxel Paint is already getting some good early traction in the app stores and it will also be used as a modding tool for the upcoming My Colony 2, I have decided to put together a small Voxel Paint section on the forum so that I have a place to document various features of the application, including tips and hidden tricks.
If you have any questions about the app or feature suggestions, use this forum!
And if you want to download Voxel Paint, you can find links to all platforms at the Ape Market:
https://market.ape-apps.com/voxel-paint.html
If you have any questions about the app or feature suggestions, use this forum!
And if you want to download Voxel Paint, you can find links to all platforms at the Ape Market:
https://market.ape-apps.com/voxel-paint.html
This script is a .vpp file loader for using 3d voxel models created with Voxel Paint in your three.js projects. This loader is used by projects such as My Empire and My Colony 2. The loader takes your vpp file and converts it into a mesh object that you can add to a threejs scene. In some instances if special features are used in your model, it may return a Group object instead of a single mesh. You can learn more about how to use threejs here: https://threejs.org/
You can download the javascript file below, and this thread will be kept up to date with the latest release of the loader.
Last Updated: 11/30/2023
Basic Usage Instructions:
In your HTML:
In your Javascript, .vpp models can be loaded from either a URL or from a Javascript Object. Here are examples for both:
The vpploader script will automatically take care of reusing geometries for you when appropriate, in the event that you are adding multiple instances of the same object to your project.
If you have any questions or suggestions for the loader, feel free to leave them in this thread! I will be adding features and improvements as I add them to the .vpp file format, so if you are using this script, make sure you check back to ensure that you have the latest version of the loader.
You can download the javascript file below, and this thread will be kept up to date with the latest release of the loader.
Last Updated: 11/30/2023
Basic Usage Instructions:
In your HTML:
<script src="vpploader.js"></script>
In your Javascript, .vpp models can be loaded from either a URL or from a Javascript Object. Here are examples for both:
let options = {

    callback: onModelLoaded,

    path: "mymodel.vpp"

};


vppLoader.getMesh(options);


function onModelLoaded(mesh) {

    scene.add(mesh);

}
The options object requires at least the path or obj parameter and the callback parameter. The callback should be a function that accepts the completed three.js mesh as it's argument.Here are the currently supported parameters for the options object:
callback: function. the function that will receive the completed three.js mesh
path: string. the relative URL of the .vpp file you want to load.
obj: object. instead of setting the path, you can specify a javascript object containing the vpp data.
color: string. if color is specified, every voxel that is set as the color #ff00ff will be swapped with the specified color.
color2: string. if color2 is specified, every voxel that is set as the color #00ffff will be swapped with the specified color.
scale: number. the scale/size of the returned mesh.
opacity number. the opacity of the returned mesh (from 0 to 1)
makeLights: boolean. if set to true, will add a three.js PointLight object to the returned model for all lights in the .vpp object that have a glow radius set.
useBasic: boolean. if set to true, model will be created using the MeshBasicMaterial, meaning it will not react to scene lighting. Better on performance, but also can be used to make a model that glows in the dark.
The vpploader script will automatically take care of reusing geometries for you when appropriate, in the event that you are adding multiple instances of the same object to your project.
If you have any questions or suggestions for the loader, feel free to leave them in this thread! I will be adding features and improvements as I add them to the .vpp file format, so if you are using this script, make sure you check back to ensure that you have the latest version of the loader.
Hello guys!
Recently, I'm feeling there are some needs for simplifying the shapes of voxel models.
I was thinking if we have a full screen of models with complicated shapes, it might be eye-pain to users.
So for user friendly purpose, I'm planning on extensive modifications on my voxel models.
The main parts will be simplifying and smoothing the shape of the voxel models.
Only voxel models from me will be modified.
We already have a forum for submitting voxel art for consideration in My Colony 2, but now that the game's built-in tools are further along and users have the ability to create entire units/structures/worlds/resources/biomes/etc., I decided it was time to open up a place for submitting complete user created content items, packaged and ready for inclusion into the game.
You can submit content in the form of either .c2m mod files, or individual .c2d data files. As of right now, it is not as simple for a user to import and test an individual c2d data file, but that will be changing very soon and will be the preferred method of submitting content for testing.
So feel free to fire up the MC2 game editor and seeing what you can make. Test it out, see how it feels in-game, and then submit it to the rest of us for testing and feedback!
Important note: as with .vpp voxel art submissions, you should be signed into My Colony 2 (or Voxel Paint for .vpp files) with your Ape Apps Account before exporting your data for review. The My Colony 2 game engine is going to parse those files to see which accounts created the content, so the authors can be properly credited in-game.
My Colony 2 is in the middle of a major overhaul to both it's logic and rendering engines. This update brings many changes that have been suggested by the community, so let's take a look at what is here and what is soon to come.
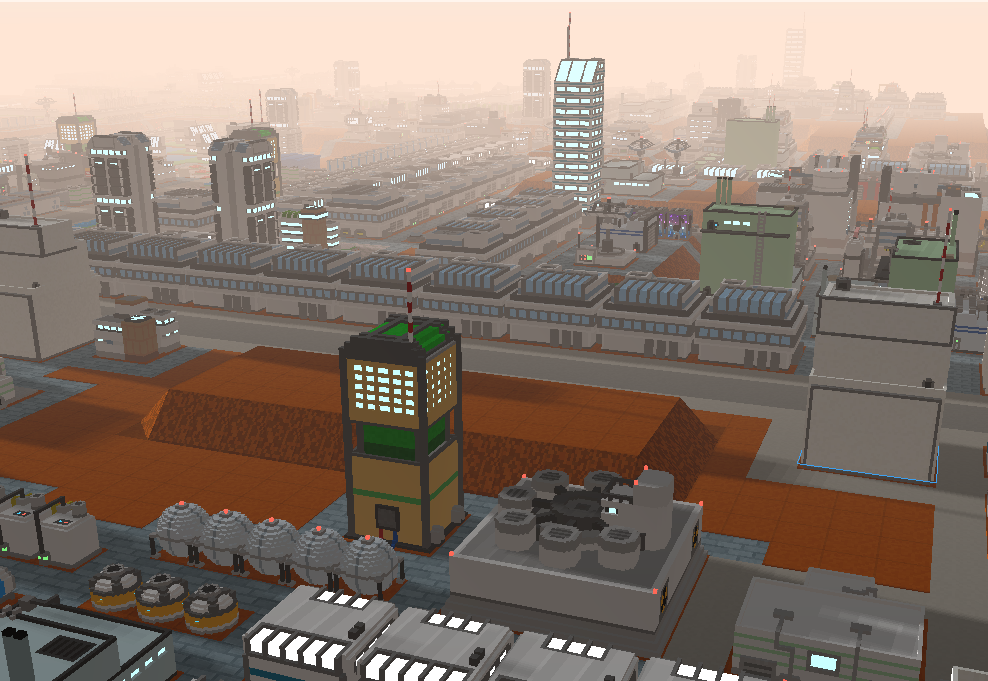
From a technical standpoint, My Colony 2 v0.40.0 (the previous release) and v0.41.0 (this release) are not even the same game. What started as a suggestion from @spamdude to process foreground settlement logic the same way background settlements are processed basically transformed into a complete rewrite of the game's server code. There is now almost no similarity in the way the game is processed compared to previous releases.
Everything in My Colony 2 is now simulated based on structure statistics, the only exception being unit/resource harvesting. This was actually going to be the original design for My Colony 2, but when I was soliciting community feedback at the beginning, there was a strong preference to have 100% accurate production stats with visible structure output bars, so the idea was scrapped (I was also going to simulate resource harvesting but that was also not a popular idea). With settlements and worlds now getting larger and larger though, I think it became apparent to many that the simulated model was best, and the game engine has now been rewritten accordingly.
This update is all about game performance, and the logic thread of the game should now be able to handle games that are several orders of magnitude larger than the largest colonies currently in existence. It is possible that some things might currently be broken or might not be working the way they were. Honestly I changed so many things this update that it would be quite easy for something to have slipped through the cracks, so please let me know in this thread or elsewhere in the forum what I may have missed. In general though, expect game performance to be much improved in this update.
Since I was already working on performance, I have been wanting to make a change to the Scroll3D engine for some time related to 3d model instancing. Basically, instead of creating a new 3d model for each structure in the game, you create one "instance" of the model which is reused/redrawn by the GPU multiple times. If you would like to see an example on how this can impact performance, please see the following WebGL example that the new code was inspired by: https://threejs.org/examples/?q=instan#webgl_instancing_performance
The reason I could not easily do this, is because 3d models using regular materials could not have both the regular face colors and the glowing "emissive" face colors without using two separate 3d models. Ultimately what I had to do was write my own custom 3d model shader material for Voxel Paint files, which now allows for regular, emissive, and metallic faces in one single model.
Lightmaps and Metallic maps are now baked right into the 3d model geometries when they are compiled in Voxel Paint. If models do not have this infomation baked in, they will need to be recompiled by the engine at run time. I already went through and recompiled most of the models in the game (especially the larger ones) so I don't think it will be much of a problem for MC2, and Voxel Paint will now automatically do this for all .vpp files going forward. This data actually makes precompiled .vpp files slightly larger, but it's not by much and I think it is worth it.
Using the new model light and metallic maps does incur a slight performance cost, as there is more shader processing that needs to be done on the models. For this reason, I have introduced two new engine settings for turning on/off voxel emissive and metallic properties. If you are on a mobile or do not have much of a GPU on your system, you can try turning them both off and seeing if it helps.
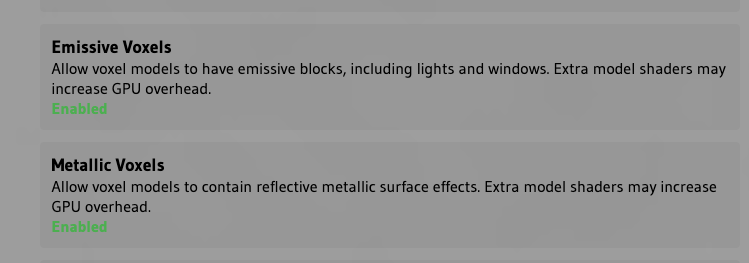
This update also removes the Depth of Field effect (Bokeh effect) from the game, the effect that would blur out the background. I might bring this back in the future, but it just wasn't focusing correctly and I did not have time to properly debug it.
So those are the main engine changes in this update. It might not seem like a ton, but it's basically all I have been working on for the past several weeks. TBH there is probably more that needs done too (please let me know), but I can't keep grinding on this update for MC2 while all of my other projects slip behind schedule, so further changes will need to wait.
There are some minor content related changes as well. Firstly, the Tree Farm and the Palm Sapling are now buildable on the Forest World, which was an accidental oversight on my part. In addition, the Spice Den can now be built on the Spice World again.
3D model art has been updated for the following structures: Barracks, Construction Yard, City Hall, Golden Shelter and Spice Drilling Operation.
Finally, two new structures from @spamdude have been added to the game, the Crystalline Trap and the Crystallizer Array, both Ice World exclusives.
I know there are now quite a few Voxel Art submissions waiting to be added to the game in the backlog. I hope to be able to get to all of these in the next update, and if I don't have to end up rewriting the whole game again then my plan is to work on those for 0.42.0. There are also changes that need to be made to the GBT to address spamming and other issues, and those are also on the list.
Hopefully the next update will not be so technically intensive and I can go back to adding fun stuff, but that will depend on how many bugs these changes introduced, so please let me know what issues you find in this release, thanks for playing mc2 and stay tuned for more!
#mycolony2
From a technical standpoint, My Colony 2 v0.40.0 (the previous release) and v0.41.0 (this release) are not even the same game. What started as a suggestion from @spamdude to process foreground settlement logic the same way background settlements are processed basically transformed into a complete rewrite of the game's server code. There is now almost no similarity in the way the game is processed compared to previous releases.
Everything in My Colony 2 is now simulated based on structure statistics, the only exception being unit/resource harvesting. This was actually going to be the original design for My Colony 2, but when I was soliciting community feedback at the beginning, there was a strong preference to have 100% accurate production stats with visible structure output bars, so the idea was scrapped (I was also going to simulate resource harvesting but that was also not a popular idea). With settlements and worlds now getting larger and larger though, I think it became apparent to many that the simulated model was best, and the game engine has now been rewritten accordingly.
This update is all about game performance, and the logic thread of the game should now be able to handle games that are several orders of magnitude larger than the largest colonies currently in existence. It is possible that some things might currently be broken or might not be working the way they were. Honestly I changed so many things this update that it would be quite easy for something to have slipped through the cracks, so please let me know in this thread or elsewhere in the forum what I may have missed. In general though, expect game performance to be much improved in this update.
Since I was already working on performance, I have been wanting to make a change to the Scroll3D engine for some time related to 3d model instancing. Basically, instead of creating a new 3d model for each structure in the game, you create one "instance" of the model which is reused/redrawn by the GPU multiple times. If you would like to see an example on how this can impact performance, please see the following WebGL example that the new code was inspired by: https://threejs.org/examples/?q=instan#webgl_instancing_performance
The reason I could not easily do this, is because 3d models using regular materials could not have both the regular face colors and the glowing "emissive" face colors without using two separate 3d models. Ultimately what I had to do was write my own custom 3d model shader material for Voxel Paint files, which now allows for regular, emissive, and metallic faces in one single model.
Lightmaps and Metallic maps are now baked right into the 3d model geometries when they are compiled in Voxel Paint. If models do not have this infomation baked in, they will need to be recompiled by the engine at run time. I already went through and recompiled most of the models in the game (especially the larger ones) so I don't think it will be much of a problem for MC2, and Voxel Paint will now automatically do this for all .vpp files going forward. This data actually makes precompiled .vpp files slightly larger, but it's not by much and I think it is worth it.
Using the new model light and metallic maps does incur a slight performance cost, as there is more shader processing that needs to be done on the models. For this reason, I have introduced two new engine settings for turning on/off voxel emissive and metallic properties. If you are on a mobile or do not have much of a GPU on your system, you can try turning them both off and seeing if it helps.
This update also removes the Depth of Field effect (Bokeh effect) from the game, the effect that would blur out the background. I might bring this back in the future, but it just wasn't focusing correctly and I did not have time to properly debug it.
So those are the main engine changes in this update. It might not seem like a ton, but it's basically all I have been working on for the past several weeks. TBH there is probably more that needs done too (please let me know), but I can't keep grinding on this update for MC2 while all of my other projects slip behind schedule, so further changes will need to wait.
There are some minor content related changes as well. Firstly, the Tree Farm and the Palm Sapling are now buildable on the Forest World, which was an accidental oversight on my part. In addition, the Spice Den can now be built on the Spice World again.
3D model art has been updated for the following structures: Barracks, Construction Yard, City Hall, Golden Shelter and Spice Drilling Operation.
Finally, two new structures from @spamdude have been added to the game, the Crystalline Trap and the Crystallizer Array, both Ice World exclusives.
I know there are now quite a few Voxel Art submissions waiting to be added to the game in the backlog. I hope to be able to get to all of these in the next update, and if I don't have to end up rewriting the whole game again then my plan is to work on those for 0.42.0. There are also changes that need to be made to the GBT to address spamming and other issues, and those are also on the list.
Hopefully the next update will not be so technically intensive and I can go back to adding fun stuff, but that will depend on how many bugs these changes introduced, so please let me know what issues you find in this release, thanks for playing mc2 and stay tuned for more!
#mycolony2
Today I have finally published the v0.50.0 update to My Colony 2. This is a technical update, brining in a complete refactoring of the engine code in order to make it work with all of the new "modular" Ape Apps libraries.
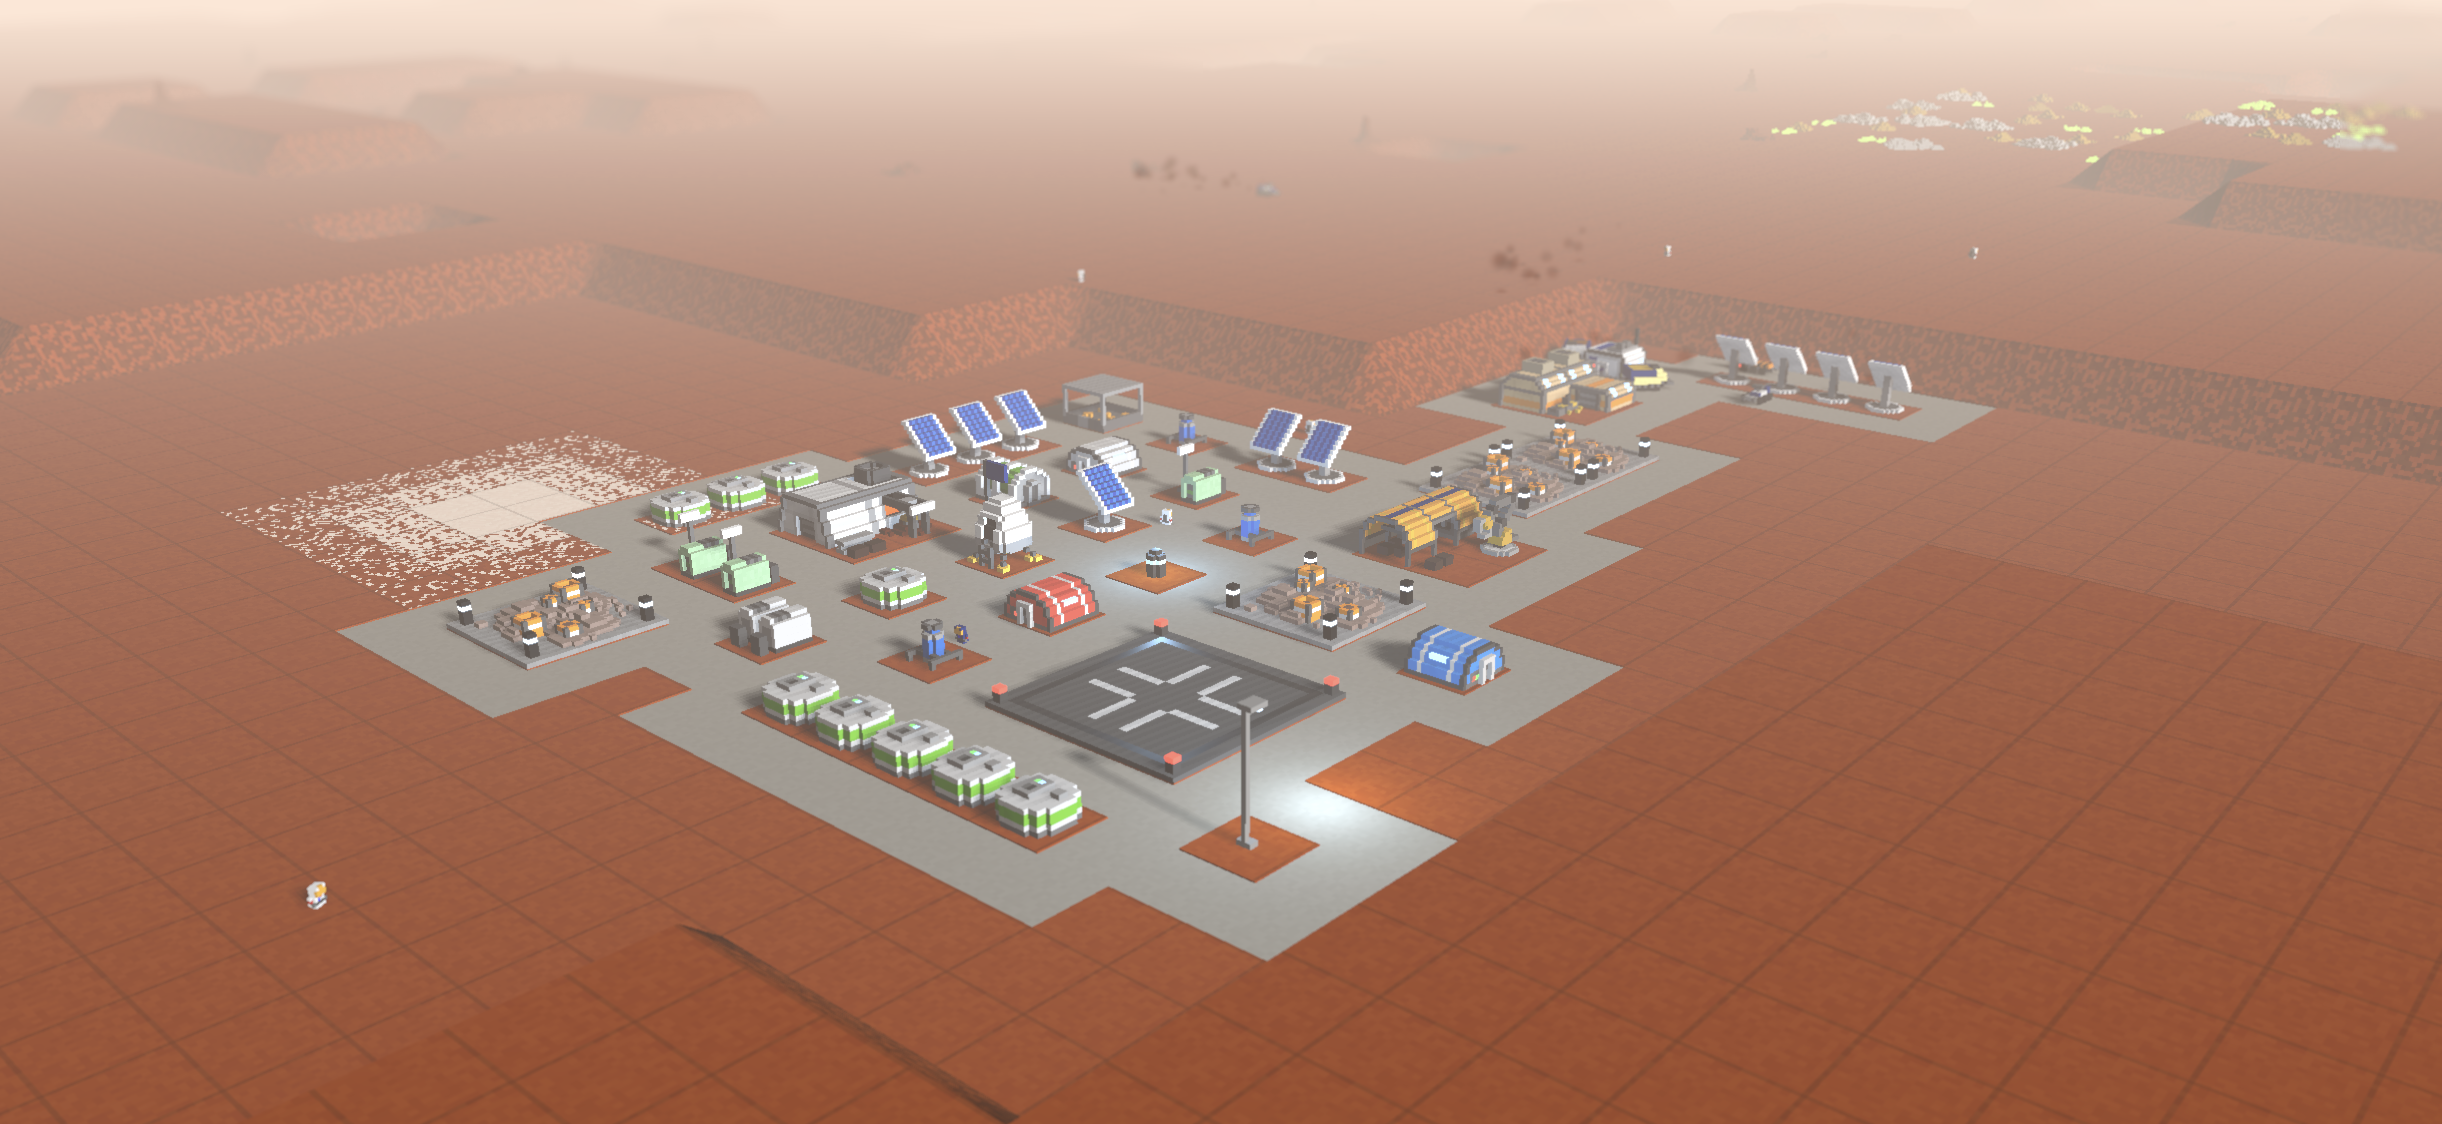
Aside from the technical changes in this release, I also tried to make some improvements to the mobile experience of the game, which has always been more of an afterthought in My Colony 2. I made improvements to the map scrolling/zooming which has always been complete jank with touch screen on MC2. I also made some minor UI adjustments and improvements to the pending building queue on touch screen. Touch-screen controls for the person mode have also been improved.
I also restored the Depth of Field/Bokeh post processing effect, that had been removed some versions back because I didn't have it working properly.
Moving forward, I am not sure what the future direction for MC2 should be. I have come to the conclusion that voxel art was a stupid design decision for the game as it is completely inefficient, and in all honesty I don't think there will ever be a way to make the game more performant than it currently is when there are a lot of models on the screen, especially big models.
I am thinking for the long term, my time might be better spent just finishing up locking down the UI/controls of the game, getting it as good as it can be on mobile, getting music/sound effects added to the game, and then start planning a new My Colony game with actual 3D models instead of voxel art models.
The issue is with how 3d graphics work. Basically everything is rendered in triangles. If you draw a scene with a single 2d plane on it, like a plain square, it is generally made by connecting two triangles together. A 3d cube would be 6 squares put together, aka 12 triangles. So suppose you want to make a skyscraper model. Theoretically, you could do it using one long cube (rectangle) with a texture mapped to it, aka 12 triangles. However with the voxel model, it is made up of thousands of small cubes which each have their own 12 triangles, so on one tall rectangular skyscraper with 12 triangles could end up having 500,000 triangles on a voxel model.
Anyway, that is a gross oversimplification of how it works, and in the real world even the true 3d models would be more detailed than what I am describing, but you can imagine how over a large colony with thousands of structures on screen at a time, the voxel art setup is not very performant. I have done a lot to get it running as good as it is, but I don't think it would ever be as great as it could be.
I also don't think that the real-time same-world multiplayer is as good of a feature as it seemed like in my head. People seem to prefer the more limited multiplayer of the original My Colony, which is actually probably better for a city building type game anyway.
But you all can let me know what you think on the matter. Until then , enjoy the latest MC2 build and stay tuned for more!
#MyColony2
bastecklein said:If you are on Windows @Vanguard , try going to:
C:\Users\YOUR ACCOUNT HERE\AppData\Roaming\Ape Apps Launcher
and deleting any files called tmpupdate.zip or updatetmp.zip (I forgot which one) and any folders that are named the same, and see if that fixes the update.
If it doesn't, you can always take the .zip file referenced above and extract it into the folder containing your current Ape Apps Launcher installation, simply overriding the existing files.
tmpupdate.zip is always 0 KB when it's still downloading and after finishing it just disappears. It also creates an empty updatetmp folder.
aDOS Player is a new front end games launcher for playing retro DOS games on any device that supports Progressive Web App (PWA) technologies. Built on top of the js-dos library, aDOS Player utilizes *.jsdos bundles to make launching and playing retro DOS games a breeze. And on top of the standard .jsdos bundle file supported by the default js-dos implementation, aDOS Player supports a few custom enhanced bundle features that allow the player to show things like game box art, information, genre and more. This post will detail how you can create your own .jsdos bundle files so that you can play any of your old DOS games in the aDOS Player application.
The first thing you are going to need to do is install the aDOS Player PWA on your system. This can be done using a Chromium based browser (Chrome, Edge, etc). To show the install prompt, navigate to the PWA using the link below, click on the Settings gear icon, and the top option should be Get the App. Clicking on that will begin the quick install process. Installing will allow local folder read access so that aDOS Player can read and manage your game library, and also file association to *.jsdos files, so you can launch into a DOS game by simply clicking on it's bundle from your computer.
https://adosplayer.com/
Next you will need some *.jsdos bundle files to get started. aDOS Player will work fine with any existing *.jsdos file you may have or find online, but you can also create your own fairly easily. A .jsdos file is simply a .zip file with a different file extension and some extra information. I am going to go over the basics here, or you can read the technical document from the js-dos developers here.
First, if you just want to quickly put together a playable bundle and do not care about the extended aDOS Player features such as box art, you can simply go to the dos.zone Game Studio tool and it will create a bundle for you automatically. I plan to eventually have similar functionality built right into aDOS Player, but have not gotten around to it yet as of this writing.
To roll your own, you need to create a .zip file that contains your DOS game as well as a folder named .jsdos with a dosbox.conf file, and a jsdos.json file. Additionally, you can put the boxart.png file in this folder, as well as three screenshot files (screen1.png, screen2.png, screen3.png).
For a demonstration of how this looks, download the following .jsdos file of the game Sim Ant. Change the file extension to .zip and look at it's contents on your computer.
You can actually use the above file as a template for packaging your own games. You can also package your game using the before mentioned dos.zone Game Studio game studio tool, download it, change the extension to .zip, add your box art, change it back to .jsdos, and you are good to go.
As mentioned before, you can also add meta data to your .jsdos bundle that can be read by the aDOS launcher. Open up the .jsdos/jsdos.json file. On top of it's standard entries, you can add a new property to the root JSON object called "adosplayer" with the following options:
All fields are optional. The "id" field is just a random GUID that you can generate anywhere, but should be unique to any other .jsdos bundle. It is not required and the player will create one automatically internally if it is not there, but it is going to be used for future cloud save syncing, so it is good to have a unique one for each bundle.
Anyway, over time I will be packing some of the most popular DOS games into aDOS Player enhanced bundles, and will be adding a function in-app to be able to browse and download the bundles automatically. In the mean time, feel free to attempt packaging your own and let me know what issues you find or requests you have. To get you started, here are the jsdos bundles for both SimAnt and Wolfenstein 3D that you can so ahead and play using aDOS Player right now.
Enjoy!
#adosplayer
The first thing you are going to need to do is install the aDOS Player PWA on your system. This can be done using a Chromium based browser (Chrome, Edge, etc). To show the install prompt, navigate to the PWA using the link below, click on the Settings gear icon, and the top option should be Get the App. Clicking on that will begin the quick install process. Installing will allow local folder read access so that aDOS Player can read and manage your game library, and also file association to *.jsdos files, so you can launch into a DOS game by simply clicking on it's bundle from your computer.
https://adosplayer.com/
Next you will need some *.jsdos bundle files to get started. aDOS Player will work fine with any existing *.jsdos file you may have or find online, but you can also create your own fairly easily. A .jsdos file is simply a .zip file with a different file extension and some extra information. I am going to go over the basics here, or you can read the technical document from the js-dos developers here.
First, if you just want to quickly put together a playable bundle and do not care about the extended aDOS Player features such as box art, you can simply go to the dos.zone Game Studio tool and it will create a bundle for you automatically. I plan to eventually have similar functionality built right into aDOS Player, but have not gotten around to it yet as of this writing.
To roll your own, you need to create a .zip file that contains your DOS game as well as a folder named .jsdos with a dosbox.conf file, and a jsdos.json file. Additionally, you can put the boxart.png file in this folder, as well as three screenshot files (screen1.png, screen2.png, screen3.png).
For a demonstration of how this looks, download the following .jsdos file of the game Sim Ant. Change the file extension to .zip and look at it's contents on your computer.
You can actually use the above file as a template for packaging your own games. You can also package your game using the before mentioned dos.zone Game Studio game studio tool, download it, change the extension to .zip, add your box art, change it back to .jsdos, and you are good to go.
As mentioned before, you can also add meta data to your .jsdos bundle that can be read by the aDOS launcher. Open up the .jsdos/jsdos.json file. On top of it's standard entries, you can add a new property to the root JSON object called "adosplayer" with the following options:
"adosplayer": {

	  "title": "game name",

	  "desc": "game description",

	  "year": 1992,

	  "publisher": "software company",

	  "genre": "arcade",

	  "id": "282fc6b0-3f7b-4fc2-8522-253c2ad6f071"

  }
All fields are optional. The "id" field is just a random GUID that you can generate anywhere, but should be unique to any other .jsdos bundle. It is not required and the player will create one automatically internally if it is not there, but it is going to be used for future cloud save syncing, so it is good to have a unique one for each bundle.
Anyway, over time I will be packing some of the most popular DOS games into aDOS Player enhanced bundles, and will be adding a function in-app to be able to browse and download the bundles automatically. In the mean time, feel free to attempt packaging your own and let me know what issues you find or requests you have. To get you started, here are the jsdos bundles for both SimAnt and Wolfenstein 3D that you can so ahead and play using aDOS Player right now.
Enjoy!
#adosplayer
A suggestion for Voxel Paint...
This is inspired by modular construction.
And here is some of my modular models for buildings
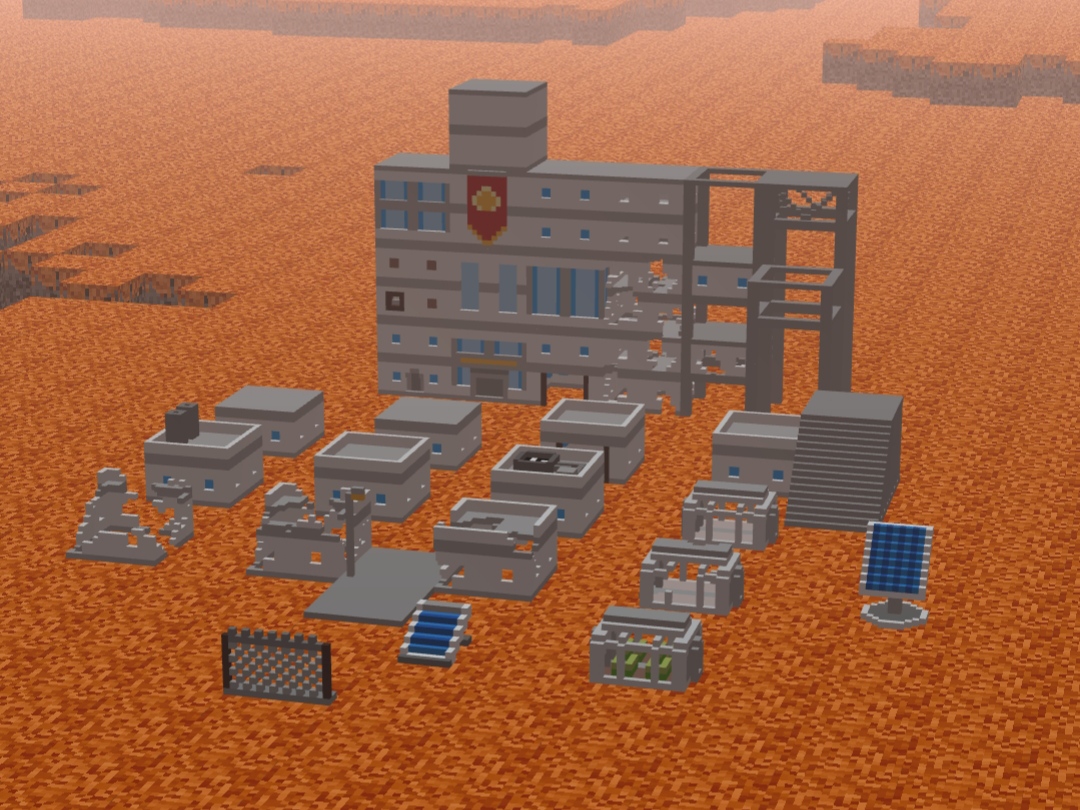
And all of them in a .zip
The idea is, it would be convenient if we can generate a new model by combinding the existing components.
Any thoughts regarding this?
This is inspired by modular construction.
And here is some of my modular models for buildings
And all of them in a .zip
The idea is, it would be convenient if we can generate a new model by combinding the existing components.
Any thoughts regarding this?
This is the updated version of all my voxel models including those simplified or reworked.
Has some new stuff along the way.
Has some new stuff along the way.
Hello @bastecklein!
Would like to let you know that new voxel models are available here.
Not the best designs, but hope you like it.
As always the update notes is in the .txt file.
Uranium miner has been edited.
This is a quite.... makeshift construction lol
Education building.
Probably for rocketry stuff. We'll need fuels for rockets anyways :P
A bigger house.
You can say, a more expensive version of tundra micromines.
I wanted to open a discussion regarding the graphics for My Colony 2.
Graphics were always the slowest part of the development for the original My Colony, as I am certainly no artist. I did on occasion receive graphics assets from various community members, but issues arise with that. Everybody using different drawing programs, has different skill levels, or graphics styles, etc. There really needs to be some standardization.
MC2 graphics will need to be 3d objects instead of flat .png or .svg files. I am currently debating between using full Blender 3d models, or going with a pixelated Voxel based look, creating the graphics using a basic drawing application I recently released called Voxel Paint (https://www.apewebapps.com/voxel-paint/)
There are pros and cons to both, which is what I want to discuss here. I would like to get the graphics format nailed down fairly early, since that is generally the slowest part of development, and if anybody wants to help contribute 3d models to the game I would be forever grateful (as would the community, I'm sure)!
Here are my initial thoughts. 3d models made up in Blender would look better. A lot better. Although it doesn't really bother me, I am not particularly in love with the pixelated look. My Colony has never been all about the graphics of course, but you can absolutely make better, more realistic looking models using Blender.
That said, it's also a lot more work, and probably reduces the number of people who can effectively help out on the project, and also increases the time required to pump out graphics. I guess it really comes down to what we all view as more important, the graphic quality vs other elements of the game. You can also certainly make a pixelated game look good, as I said before there are a lot of popular games out there with a pixelated look.
Anyway, I am open for all feedback on this issue before making a decision. This is one of the first things I would like to nail down, as a lot of the design of the game will depend on it, and it would be nice to already have some content ready to go for engine design and testing.
I am personally leaning slightly towards the voxel based solution, but it's not a hard lean. I like the ease and speed of output, and being the developer of the application I can add things or tailor it to the game's needs. I am just as fine going the other route too though.
So let me know what you all think on the matter. Whatever is decided, I would like to lay down some standards for the graphics right at the beginning, so that everybody who is willing to help with graphics will be on the same page and that everything created is actually usable in-game!
Here is a collection on concepts that I am leaning towards for My Colony 2 as of today (20200624). This is all subject to change and I can be convinced by the community of anything, so keep the suggestions and feedback coming. This is going to be a super long post featuring all of my thoughts on MC2 thus far. Feel free to criticize anything and everything here. My feelings will not be hurt and nothing is set in stone. This is a starting point for community discussion to help make MC2 the best game it can be!
Relationship to My Colony 1
MC2 is an entire new game, not an upgrade to the original, or a version 2.0. It may use completely different concepts. It will not be tied in to the same server. Game files will not transfer over, as MC2 will probably have completely different buildings/tech tree, etc.
This does not mean that MC1 will be going away. I will continue to support the original and the server indefinitely. I realize that a lot of people like the style of game that MC1 is and do not want anything to change, so the original is staying where it is. It may continue to receive new content as well as bug fixes, but I do not plan on any further changes to the gameplay mechanics or core engine going forward.
That said, as long as MC1 remains popular and people keep playing it and paying for it, I will keep the game going.
Business Model/Monetizing
This is the least fun part of development, but a necessary one in order to make creating a game feasible. The business model for MC1 was tacked on as an afterthought, and reflecting back I do not like the concept of certain structures and units being premium.
None of this is set in stone, but here are my initial thoughts on the business model. My Colony 2 will be a straight paid app on all app stores, with everything unlocked at the base price, no in-app purchases. No advertising anywhere. The exception is on Ape Web Apps and the Ape Market, where it will be free, everything unlocked, but with no access to multiplayer or custom content. Maybe only one map type available.
Current My Colony 1 is basically already like this on Desktop, with the mobile client being free with additional IAP, so this change just makes the mobile version match up with what is already on desktop.
Now, I do anticipate the dissatisfaction of Android players not having the free version in the Play Store. However, Android support for Progressive Web Apps is sufficiently advanced now that you can just install the Web version to your homescreen like an app and it's hardly any different. Same with iOS. And MC1 will still be available for free like it always has been.
No free version on the mobile app stores will likely mean less players, and I understand this. But I like the idea of just buying a game and having the whole thing, not worrying about IAP's and not having any advertising.
Client/Server Structure
The biggest change to MC2 is it's design from the ground up as a multiplayer game. This does not mean that you cannot play single player, but it is being designed specifically for multiplayer.
MC1 has limited multiplayer, which basically consists of chat and trading/gifting resources. You can play together on a multiplayer region, but all you are really doing is sharing atmosphere and seeing thumbnails of other players' colonies. Not really very multiplayery (is that a word?). The MC1 multiplayer is also global and centralized, meaning everything has to go through the global My Colony server.
My Colony 2 multiplayer will be decentralized, meaning no global server that everybody plays on. Why am I doing this, because it seems like a downgrade? Look at every game out there with real global multiplayer, not just chat and trading. That takes massive infrastructure, and you pay for it with either a monthly subscription or endless IAP's. That's the only way it's really possible, and I don't think anybody wants that if you really stop and think it through.
The only realistic way to add real multiplayer to the game without investing in a massive infrastructure and charging big money for the game is to decentralize it. And since I am not Blizzard and do not want to spend my whole life maintaining MC2 servers, I am adopting a decentralized approach.
What does this mean? My Colony 2 will actually be designed as two separate applications in one, the client and the server.
The game client will be fairly light weight. It's job is to receive data from the server application and render it to the screen, and pass instructions as to what the player wants to do onto the server. That's pretty much it, and it should be fairly performant. Even though the game is moving to 3d, I still expect it to perform better than MC1, simply because 3d hardware rendering performs better than 2d software rendering.
The game server is much more interesting and is where all of the game mechanics take place, but since the server does not have to worry about handling the UI or making drawing calls, it actually has a bit more overhead to work with than on MC1. The two most expensive operations in MC1 are the rendering and the pathfinding. In MC2, the server is eliminating the rendering, and I also want to greatly reduce the pathfinding, leaving more headroom for actual fun stuff, like game mechanics simulation.
So in MC2, the game relationship is between client(s) and server. Whenever you create a new game in MC2, you are creating a new server, and then connecting to it with a client. The server is saved and retained between plays, where the client only exists while it is in use, and is not saved. So the point I just want to get across is that the client is really not that important, the server is.
The server and client code are both included in the My Colony 2 game. You will have the option of starting a regular game or creating a dedicated server. When you start a regular game, you are spinning up both a client and server and creating a 1-1 connection between the two right on your device. You can also make your game joinable by friends or others on your local network for multiplayer.
You can also create a dedicated server. When you create a MC2 dedicated server, you will be presented with a special server GUI that allows you to be in full control of the game. The server will continue to process game data as long as it is running, even if no players/clients are connected. A dedicated server will be able to establish custom game rules and parameters, and have mods installed that will be transferred to any client who connects. You will be able to make a dedicated server open to the public, or by invite only, or by specifying a list of accounts who are able to join. It's up to the server. A dedicated server will be able to moderate it's players however they want, the server can adjust resource levels, ban players for cheating, or anything. It's all up to the server owner.
The game data is saved only on the server, and the server owner will be responsible for making backups. I expect game files to be a lot bigger than MC1, so I am not going to be implementing Cloud Sync, which is known to cause corruption on larger files anyway. The ability to export and backup data will be built right into the game as usual.
Because of the way it's designed, even if you only want to play single player, it still may be desirable to set up a private dedicated server. For instance, you could run a private MC2 dedicated server on your powerful home PC that is always on/connected to the internet. Then you can connect to your server from your tablet/phone/laptop/another window on your computer, wherever you are, and your game is always there waiting for you, and all of the processing is being done on the more powerful computer.
The Game World/Game Files
In MC1, the game world is divided into cities and regions, and each city is a separate game file. In MC2, there are no cities and regions, there are planets.
This is something I am aping from Minecraft. A planet is like a regular city file in MC1, except is extends out in every direction to infinity, so you do not have to worry about running out of space for your city. A planet can have multiple cities and multiple players building cities at the same time.
Planets will be procedurally generated, and new areas will be generated in real-time as needed. Each planet type will have different biomes like in Minecraft, so that different environments and different resources are available in different parts on the planet.
This system means that you will have to build up trade networks with other cities or make additional settlement outposts across the planet in order to bring more resource types back to your colony. In MC1, practically every resource in the game is available with a square mile of your lander. This doesn't really make sense. In MC2 you will have to go out and find resources, and then build up a network for bringing them back into your city.
Technically, the MC2 world is still a big 2d grid like in MC1, but each tile does have an elevation, a z-index, for varied terrain elevations. Different resources might be found at different elevations and in different biomes. You will also be able to adjust the terrain in-game, like building up dirt to level out construction areas. There will be flat areas good for building, low canyons, and hilly or mountainous areas.
Also like in Minecraft, the terrain is generated on the fly and only transferred to the client in "chunks" as needed. So your client will only contain the data for the area that you are currently looking at, and the immediate surrounding areas. As you scroll around the map, areas you are no longer looking at will be disposed from memory as new areas are loaded from the server.
Construction / Resource Gathering and Rovers
I would really like to get rid of Rovers completely and simulate everything. It's not that I hate rovers, they are so helpful and adorable. The issue is with the pathfinding. Just driving rovers around the map takes up a huge percentage of the MC1 processing time, for what is essentially a visual effect.
Pathfinding is both CPU and memory intensive on anything larger than a medium sized MC1 map, and in MC2 the map sizes are being expanded infinitely larger. It's not just as simple as "only path finding around a certain area from the rover." Before you can even calculate pathfinding operations, you first have to generate a pathfinding map and load it into memory. The maps will be more expensive than in MC1 owing to the introduction of terrain elevation, as there will now be cliffs to work around. Each time a new structure is placed the pathfinding map needs to be recalculated. With the game being multiplayer, this will have to be taking place on a larger scale. It is one of the features holding MC1 back, due to all of the CPU time that must be dedicated to solving rover paths.
The issue of course, is that everybody likes rovers. Even I like rovers. Would the game be less fun without them? I don't know. If you could just turn off Rover Rendering in the engine settings and you didn't even see them, but everything continued to operate as normal, would it make a difference to the game, or would it matter? Maybe it would, maybe it wouldn't.
Everything a Rover does can be simulated for a fraction of the CPU and memory cost.
This is the largest part of MC2 that I don't have an answer to. I can't just remove rovers because that would be a blow to the fans of MC1. I also cringe thinking of all of the months wasted on optimizing path finding and the 1 star complaints about performance, all relating to a path finding feature in what is essentially a city building game.
There are options.
I could always just keep rovers in the game as they are and just keep working around the processing issues that come with it. In a single player game or a server with only a few active players at once, it probably wouldn't be a very big hit.
I have also considered just simulating rovers, sort of like colonists are just simulated in MC1. For example, you don't even have to build your own rovers. But when you place a new construction order, little rovers drive up onto the construction site and build your building anyway. These rovers do not exist on the server, but you see them building on the client. Same way for moving resources around. On the server it is just simulated, but on the client, you see a rover driving around doing all of the work. This would still require path finding, but each client would be doing their own path finding on the visual rover effect, and the player could turn it off if it became a performance issue.
If the client could just visually simulate things like rovers, colonists, police cars, busses, etc, they would all still be there visually making your city look alive, but the server wouldn't even have to worry about them.
Maybe there are other options too that I am not thinking of? All feedback on Rovers is welcome. I want the game to be performant, but I also don't want to go against the fans, so please let me know what you think either way.
Graphics
MC1 is a software rendered game using the HTML5 canvas element, arranging .png and .svg tile images onto a 2d isometric grid. Most of the graphics processing is done by the main CPU and not the graphics card, so graphics performance is largely defined by how good your processor is. This is why the game runs a lot better on desktop vs mobile, or even on iPhone vs android, and iPhone processors tend to be a bit better.
The problems is that the CPU also has to process the game, so trying to do everything at once gets expensive, especially on mobile devices.
My Colony 2 is moving to WebGL for graphics processing, which is a javascript based implementation of OpenGL that handles rendering on the GPU. This should lead to far better performance on most devices.
My original idea was to use Blender for all of the games building models. The graphics were going to be awesome. But when I dug into Blender and started working with it, I remembered how I am not actually a graphics designer, and it was going to take me forever to make all of the models for this game.
My other idea was to make blocky pixelated type graphics using my own Voxel Paint application (https://www.apewebapps.com/voxel-paint/). This means lower quality visuals but much higher output and probably better rendering performance as well. It's also so easy to use that anybody could make their own MC2 models, my wife even offering to help design structures for the game (she is a big Minecraft fan).
At the end of the day, My Colony 1 was never known for high quality graphics, but I thought that with MC2 I could really make it look great. After putzing around with Blender though, I have to acknowledge my own personal limitations. Basically, I can either spend months learning how to make great 3d models in Blender, or I can spend months working on the game code. I know which one I'd rather do. So I am probably going to go with the pixelated look, simply because it is something that I can actually do myself within a realistic timeframe, and it will also go well with the next point I'm about to explain, which is modding.
I know some people will not like a pixelated looking game. This is one of those areas where I have to say "tough," unless somebody is willing so supply me with hundreds of 3d models free of charge, which is what it is going to take in order to do this properly.
Modding
Customization is going to be huge in MC2 compared to the original. Given the global online multiplayer in MC1, custom content could not realistically be allowed in the game. The decentralized nature of MC2 changes everything though, and modding and customization, as well as all of the tools needed to make it happen, are going to be baked right into the client.
In MC2, the basic "unit" of the game is the building. Everything is going to be pretty much based on buildings, and their relationship to each other. This is basically how MC1 works as well, so this is nothing new. What is going to be knew is My Colony 2's build in Building Editor.
I am going to be creating MC2 using the games' bulit-in editor, and so the same editor I use to make the game is going to be available to all players.
Each building in the game is going to be stored as a building file, and the base game will ship with all of its standard building files, which will be loaded at runtime. This differs from MC1 where all building data is stored in a single JSON file that is shipped with the game, which cannot be easily edited.
A building file will contain three parts.
The first is the JSON formatted definition data, with information about the name of the building, what it does, what it generates, etc. All of the properties that a building can have will be stored in that data.
The second part is the model information, which will essentially be an embedded Voxel Paint file.
The third part is a small (maybe like 64x64 pixel) thumbnail or icon representing the building, which will show up on the construction sidebar and various places throughout the UI.
The three above parts are all packaged into a single file which can be added to the game client, posted online for easy sharing, or what have you. A dedicated server can include custom building files that will automatically be distributed to clients when they join the game. Each building file will have a unique UUID and version information, so if a client already has the same version of a building file that a server does, it will not need to re-transfer the data upon connection.
This system is actually a very powerful change over the original My Colony, and unlocks essentially limitless possibilities for the game. This also makes it a lot easier for the community to participate in development of the game. A creator who makes a great building idea can distribute it online where it is tested out and balanced by the community. If it works in practice and everyone likes it, the file can be included in the base game.
If you want to host a crazy dedicated server with a bunch of custom buildings that totally change the game, you can do so.
I have no idea what kind of buildings people will dream up, but including the content creation tools right into the base game will be huge, I hope. And I plan on making the process as easy as I possibly can, so that anybody can create a building. Using Voxel Paint, if you have an idea and the ability to build a house in Minecraft, you should be able to make it a reality. And being able to make something and then instantly import it into your game makes it simple to test out concepts and balance them right there on your own device.
It's possibly that nobody will care about modding or making buildings, but it still doesn't hurt to add the tools right into the game. If nothing else, it will still make it easier for me to create new content for updates, versus having to go through and edit JSON data manually.
However, it's also possible that everybody will be making custom content and the game takes off in crazy directions that we never even imagined!
It could even be possible to allow mod creators to somehow sell their mods in-game and get paid in real money, maybe through PayPal or something. That is a thought for another day though, and not a current actual plan.
Conclusion
These are my current thoughts on MC2 as of this day. Like I said, nothing is set in stone yet and everything is subject to change. I wanted to put everything out there so that the community knows what page I am on and where I am headed, and has time to stop me if I am about to drive over a cliff.
Remember that I am open to all feedback, so if you have ideas, please don't just be quite about it, or don't just complain about them in a Discord chat somewhere, because I probably will not see them. Part of being a game developer is getting hate e-mail on a regular basis on why my games suck, so believe me that your being critical of the above ideas will not hurt my feelings, and will be nothing new to me.
The whole purpose of doing all of this beforehand is to get real feedback from the community so that MC2 can go in a direction that we all like and we will all have fun playing. Once I start getting into the code, it gets harder and harder to make changes, so if there is something you don't like, now is the time to mention it. Think of all of the things I could not effectively implement in MC1 because they would require massive time-consuming changes to the entire engine. So getting ideas in right now is how we avoid that.
Like MC1, I'm trying to make something fun that I myself want to play, not a game that is going to just nickel and dime players with constant ads and IAPs so I can sit on a yacht somewhere. I think the new decentralized play model will allow the game to outlast the original. Basically, if I get in a wreck and die, the MC1 server will be forever down within a few weeks. With MC2, once players can make their own servers and create their own content right from within the game, what happens to me becomes more irrelevant, which is the way it should be.
Anyway, if you got this far, then thanks for reading my small novel. Please give some thoughts to where you want to see the game go, or discuss it with other players and really think about all of the concepts I laid out here. I want to start working on the game soon, maybe as early as mid-next month. I plan to start with the world-generating engine and the in-game building creation tools first, so people can start testing that out and seeing what it is like to make their own content.
So between now and then, if any of the above ideas are way off the mark, I need to know now. So think about it, let me know, and thanks for helping me create the follow-up to My Colony. I think it's going to be fun!
bastecklein said:Blender models look better for sure. My reasoning for preferring voxel models comes down to consistency of the look of the game and the amount of time I want to spend on graphics VS development. I can guarantee that the My Colony community will produce far less content in Blender VS voxels, due to the complication of the software. I could barely even get any submissions for MC1 content using .svg format and Inkscape, which is a whole lot easier to use than Blender.
Compared to voxels, the look of which can mask the skill level of the artist a bit, the player will be more likely to recognize a difference in artistic style and skill level of a model made in Blender. I think a janky model that I am able to throw together VS one a skilled artist produces will be obvious to all.
Which leads to my last point, which is my own personal skill level. I am not a graphics artist by any stretch of the imagination, I am no Blender expert, and after spending some time with the application, it is going to take a bit of effort to get my skills to a point where I can create the content for this game. That is time diverted from making actual progress on My Colony 2, not to mention all of the apps I have to support which pay for me to be able to work on games which are less profitable. In the time it would take me to create something basic in Blender, I was able to just create the Voxel Paint app instead and then move on to other things.
And one final thing, since the suggestion always comes up when I mention graphics, so I might as well get it out of the way. I cannot count how many times I have gotten over the years: "just hire some graphics artists, more programmers, etc," which is a fine suggestion, but I have also seen many times: "OMG $5 for premium and regions aren't even free, bast is turning into EA, I wont pay $5 for this!" There is a reason why games either cost $60 or are full of nickel and dime IAPs - because that is what it costs to hire staff and support servers. This is why I generally prefer to do things on my own and within my own skill level, to keep costs little to nothing for the player.
But those are just my thoughts on Blender. I am still not opposed and nothing is final yet, so if I can be convinced that I am wrong then I am open to that too.
I think we can all agree that models with high detail will take a lot of time and are not worth it, the only reason these models are high res is becuase they were simple to make and I couldnt resist making them look realistic (they were really easy to make, I spent the last hour of my day for the past 2 days using blender to make these) . Voxel models are definitely better for saving time, but they don't look as good. But I know of a way to get the best of both worlds, loy poly modeling. Low poly models can be made in minutes and look way better than voxel models, plus there are plenty of easy and short low poly tutorials for beginners. If you want to check out low poly modeling I would highly recommend checking out the Grant Abbitt channel on youtube, it has lots of blender begginer tutorials covering low poly modeling and other subjects. I would also recommend you check out the first few parts of the blender donut tutorial to get familiar with blender's hot keys, they will save you alot of time.
Here are some quick tutorials I would recommend checking out:
https://www.youtube.com/watch?v=6mT4XFJYq-4
https://www.youtube.com/watch?v=OlnkGCdtGEw
https://www.youtube.com/watch?v=TPrnSACiTJ4
Today I am updating Voxel Paint to v1.3.0 with some minor fixes and new features in store.
Firstly, based on a comment I saw in Discord, I have added the ability to import .vox files created with the MagicaVoxel application.
Voxel Paint now has an x:y:z coordinate readout at the bottom right of the screen.
Finally, the bucket fill tool now has a "fill with noise" option. If you hold down on the Shift key while using the bucket fill tool, the color of the area you are filling will have a random noise filter applied to it as well.
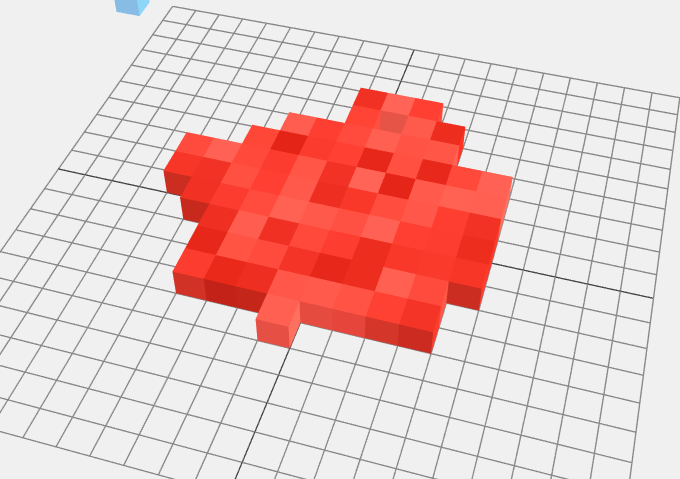
That's it for this Voxel Paint update, which should be hitting all platforms in the coming days. More capabilities and goodies to come!
Firstly, based on a comment I saw in Discord, I have added the ability to import .vox files created with the MagicaVoxel application.
Voxel Paint now has an x:y:z coordinate readout at the bottom right of the screen.
Finally, the bucket fill tool now has a "fill with noise" option. If you hold down on the Shift key while using the bucket fill tool, the color of the area you are filling will have a random noise filter applied to it as well.
That's it for this Voxel Paint update, which should be hitting all platforms in the coming days. More capabilities and goodies to come!
Of course. Each tile in the game is 16x16 voxels in size, so in voxel paint you would set image size to 16.
All buildings should be a square multiple of 16. Being square will allow full 360 degree rotation of any building.
Any voxel that is colored #ff00ff will be transformed by the engine into whatever color the owning player is.
For size reference, here is the lander file, you can observe and match the scale.
Also if you are logged into voxel paint when you create your model, your username will automatically by parsed by the game when the in-game credits are added and displayed.
I will create a more detailed guide at some point, but this is a good starting point.
I have been thinking of that very issue @GeneralWadaling due to the day/night cycle in the game.
In MC1, the lighting effects are a simple filtered color overlay drawn over the game screen, so they do not impact performance too terribly much.
For MC2, the performance hit would be far greater. You can see it yourself in the time it takes to render a scene in MagicaVoxel, which is actually a compiled application (unlike JS) and is only performing a single render (MC2 needs to perform the render, ideally, 60 times every second).
Generally lighting in a 3d game uses pre-baked light maps, where all lighting information is compiled and saved before hand. In MC2 this can't really happen since the player is literally building the game world in real time.
For performance reasons, an actual 3d scene can have at most 50-60 point lights on a fairly high end desktop computer. That might sound like enough, but for a large city with a lot of lit up buildings, it's not enough at all. And for mobile that number could be as small as 5 or 6. I ran into this problem when I started adding dynamic lighting to Death 3d. I was putting lights everywhere and the game was starting to look absolutely beautiful until the engine ground to a halt, and on mobile it would only display a black screen.
There are options to fake lighting though, which I am considering. First of all, I am considering adding an option in Voxel Paint to make a voxel "illuminated." Basically, the voxel would not emit any light outwards, but it would be unaffected by the world light level, making it appear to glow in the dark. This option will be added in Voxel Paint v1.6.0 (I am releasing 1.5 today), whether or not it is implemented in MC2. Even that will add some overhead to the engine though, as the illuminated voxels would need to be broken out into a separate object, and then the two models would need to be grouped together as one, or multiple if different brightness intensities were desired.
You can also use a static sprite to fake lighting on the ground, which is a method used in a lot of games that require dynamic lighting. Basically you take a .png image which is a circle that has a gradient of white (or whatever the light color) in the center, and fades to transparent around the edges. You then just lay this sprite on the ground where you want a light to shine and do some color blending to make it look like the area under the light is illuminated.
I could also add a "Render" option to MC2, where just for a single frame it can compile your current scene with all sorts of lights and effects turned on and save a static picture for you. Could be a fun little option. In conclusion though, I have absolutely been thinking of this very issue, it's just a bit more complicated than it seems it should be. At the end of the day though, it will need to be "hacked" in some way, because just having each building or unit emit it's own light will simply not be doable :-/
bastecklein said:I have been thinking of that very issue @GeneralWadaling due to the day/night cycle in the game.
In MC1, the lighting effects are a simple filtered color overlay drawn over the game screen, so they do not impact performance too terribly much.
For MC2, the performance hit would be far greater. You can see it yourself in the time it takes to render a scene in MagicaVoxel, which is actually a compiled application (unlike JS) and is only performing a single render (MC2 needs to perform the render, ideally, 60 times every second).
Generally lighting in a 3d game uses pre-baked light maps, where all lighting information is compiled and saved before hand. In MC2 this can't really happen since the player is literally building the game world in real time.
For performance reasons, an actual 3d scene can have at most 50-60 point lights on a fairly high end desktop computer. That might sound like enough, but for a large city with a lot of lit up buildings, it's not enough at all. And for mobile that number could be as small as 5 or 6. I ran into this problem when I started adding dynamic lighting to Death 3d. I was putting lights everywhere and the game was starting to look absolutely beautiful until the engine ground to a halt, and on mobile it would only display a black screen.
There are options to fake lighting though, which I am considering. First of all, I am considering adding an option in Voxel Paint to make a voxel "illuminated." Basically, the voxel would not emit any light outwards, but it would be unaffected by the world light level, making it appear to glow in the dark. This option will be added in Voxel Paint v1.6.0 (I am releasing 1.5 today), whether or not it is implemented in MC2. Even that will add some overhead to the engine though, as the illuminated voxels would need to be broken out into a separate object, and then the two models would need to be grouped together as one, or multiple if different brightness intensities were desired.
You can also use a static sprite to fake lighting on the ground, which is a method used in a lot of games that require dynamic lighting. Basically you take a .png image which is a circle that has a gradient of white (or whatever the light color) in the center, and fades to transparent around the edges. You then just lay this sprite on the ground where you want a light to shine and do some color blending to make it look like the area under the light is illuminated.
I could also add a "Render" option to MC2, where just for a single frame it can compile your current scene with all sorts of lights and effects turned on and save a static picture for you. Could be a fun little option. In conclusion though, I have absolutely been thinking of this very issue, it's just a bit more complicated than it seems it should be. At the end of the day though, it will need to be "hacked" in some way, because just having each building or unit emit it's own light will simply not be doable :-/
The solution here is to implement real time ray tracing. It works by reducing a frame's samples to extremely low levels ( thus speeding up render times), then using AI to improve the quality of the frame until it looks realistic. Lots of games are implementing this feature now, including minecraft (which looks similar to MC2).
MC2 with real time raytracing could look similar to this, minus the detailed bushes: